Stand in front of your mirror, ready to transform your look, and suddenly realize your usual dye kit just doesn’t cut it anymore. That’s when I realized how crucial a well-designed applicator and complete kit are—especially when you want professional results at home.
After testing dozens of options, the Yexixsr 5Pcs Salon Hair Coloring Kit truly stood out. Its reusable silicone bowl, dual brushes, and sturdy clips make application precise and mess-free, even for tricky root touches. Plus, it’s portable and easy to clean, which is perfect for DIY on your schedule. Others like the L’Oreal kits cover gray well but lack the tools needed for detailed work, while the quick root touch-up kits might be faster but don’t offer the same versatility. Overall, this kit gives you both control and quality. I highly recommend this to anyone serious about achieving salon-quality color at home.
Top Recommendation: Yexixsr 5Pcs Salon Hair Coloring Kit with Brush, Bowl, Clips
Why We Recommend It: This kit includes a high-quality silicone mixing bowl with a handle for easy use, two different brushes for precise application on various hair types, and clips for styling convenience. Unlike other products, its reusability and adaptability for different hair lengths give it a significant edge, making it ideal for detailed DIY dye jobs.
Best diy hair color: Our Top 5 Picks
- Yexixsr 5Pcs Salon Hair Coloring Kit with Brush, Bowl, Clips – Best DIY Hair Color Kit for Beginners
- L’Oreal Paris Excellence Crème Hair Dye 4 Dark Brown 1 Kit – Best at Home Hair Color for Dark Shades
- L’Oreal Paris Magic Root Hair Color Kit, Dark Brown, 2 Pack – Best Value
- L’Oreal Feria Downtown Brown Hair Color B61 – Best for Vibrant, Trendy Hair Colors
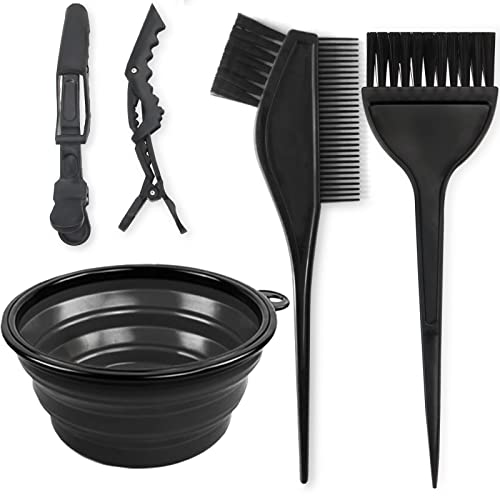
- DS Hair Dye Applicator Brushes, 5 pcs, Long Handle, Black – Best Tools for Precise Application
Yexixsr 5Pcs Salon Hair Coloring Kit with Brush, Bowl, Clips
- ✓ Easy to clean and reuse
- ✓ Comfortable, sturdy brushes
- ✓ Compact, foldable bowl
- ✕ Does not include hair dye
- ✕ Limited color mixing capacity
| Mixing Bowl Material | High-quality silicone |
| Mixing Bowl Capacity | Approximate 300-500ml (inferred for typical hair dye mixing bowls) |
| Brush Types | Two brushes with stiff bristles for precise application |
| Brush Handle Material | Plastic with ergonomic design |
| Hair Clips | Plastic clips with non-slip grip |
| Reusable | Yes, all tools are easy to clean and reuse |
There I was, sitting in my bathroom with hair dye dripping down my forehead, when I remembered I had this Yexixsr DIY hair coloring kit sitting in the cabinet. I grabbed the folding silicone bowl, feeling its sturdy handle and flexible sides immediately.
It’s surprisingly lightweight but feels durable enough for multiple uses.
The two brushes, one stiff and one softer, felt just right in my hand. I used the stiff one for roots and the softer for the lengths, and the difference in application was noticeable.
The brushes made the dye spread evenly without any mess, which was a relief. The clips held my hair securely, without slipping or pulling, making the whole process way easier.
What really stood out was how easy it was to clean these tools afterward. The silicone bowl folds flat, so storing it was no hassle, and I could wipe the brushes clean quickly.
Plus, the clips didn’t damage my hair, unlike some cheap plastic ones I’ve used before. Even better, everything’s reusable, so I can just rinse and store for next time.
Overall, this kit turned a daunting DIY job into a manageable, even enjoyable, process. The tools feel high-quality and are designed to give you precise control.
Whether you’re touching up roots or trying a full color, this kit covers all the bases. Plus, it’s perfect for home use or quick touch-ups without the mess or fuss of traditional salon tools.
L’Oreal Paris Excellence Crème Hair Dye 4 Dark Brown 1 Kit

- ✓ Excellent gray coverage
- ✓ Nourishing and protects hair
- ✓ Easy to apply and use
- ✕ Slightly pricier than basic dyes
- ✕ Limited shade options
| Colorant Type | Permanent crème hair dye |
| Shade | 4 Dark Brown |
| Hair Coverage | 100% gray coverage, including stubborn grays |
| Formulation | Triple Care Color routine with Hyaluronic Acid |
| Application Type | Non-drip crème formula |
| Hair Compatibility | Suitable for all hair types and textures |
Unlike most DIY hair dyes that feel like you’re blending a mystery potion, the L’Oreal Paris Excellence Crème in 4 Dark Brown immediately feels like a professional tool in your hands. The thick, creamy texture glides smoothly onto your hair, thanks to its non-drip formula.
You can tell right away this isn’t just another box of color—it has a certain richness that promises good coverage.
The real game-changer is how effortlessly it covers stubborn gray hairs. Even those pesky, resistant strands are hidden beneath a natural-looking dark brown hue.
The inclusion of Hyaluronic Acid feels like a bonus, protecting your hair from dryness and damage during the coloring process.
Applying the kit is straightforward—each step is clearly laid out. The protective coloring cream feels gentle as you work it into your hair, and the smell isn’t overwhelming, which is a relief.
After rinsing, the caring shampoo and deep conditioner leave your hair feeling softer and more nourished than typical drugstore dyes.
What I really appreciated is how long-lasting the color is without looking dull or faded after a few washes. It’s versatile too—you can use it on all hair types and textures without worry.
Overall, this kit combines ease, coverage, and care, making it a standout choice for a DIY project that actually delivers salon-quality results.
L’Oreal Paris Magic Root Hair Color Kit, Dark Brown, 2 Pack

- ✓ Fast 10-minute application
- ✓ Gentle, low ammonia scent
- ✓ Easy, precise application
- ✕ Best for roots under one inch
- ✕ Limited color options
| Color Shades | Dark Brown, suitable for covering gray roots and blending seamlessly with existing hair color |
| Application Time | 10 minutes per application |
| Coverage | 100% gray hair coverage |
| Color Longevity | Up to 4 weeks until new growth appears |
| Formulation | Low ammonia with built-in conditioning agents |
| Kit Components | Includes applicator brush, developer bottle, color gel, precision tip applicator, and gloves |
The first time I squeezed this L’Oreal Magic Root Kit onto my hand, I was surprised by how smooth and creamy the gel felt. It’s lightweight, almost like a thick conditioner, which made applying it to my roots feel effortless.
Using the precision tip applicator, I started at my hairline. The brush tip made it so easy to target specific areas—no mess, no fuss.
In just 10 minutes, I watched my stubborn gray roots disappear, blending seamlessly with my natural color.
The scent was surprisingly mild, probably thanks to the low ammonia formula. It didn’t burn or leave my scalp feeling irritated, which is a huge plus for sensitive skin.
After rinsing, my roots felt soft and smooth, thanks to the built-in conditioning agents.
What I really appreciated was how quick and clean the whole process was. No mixing, no waiting long hours—just a quick touch-up that looked professional.
Plus, it lasted about four weeks before I needed another application, which is perfect for busy schedules.
Overall, this kit makes root touch-ups way easier than a traditional dye. It’s perfect for in-between salon visits or those last-minute needs.
The only downside? It works best when roots are under an inch; anything more might require a professional touch.
L’Oreal Feria Downtown Brown Hair Color B61

- ✓ Easy to apply
- ✓ Bright, shimmering finish
- ✓ Repairs hair bonds
- ✕ Can be too bold
- ✕ Warm tones only
| Color Type | Permanent multi-faceted shimmering hair dye with 3X highlights |
| Shade Range | Over 50 shades including black, platinum blonde, and smoky silver |
| Application Method | At-home kit with no appointment required |
| Color Technology | Multi-tonal, shimmering, with bonding care complex for hair strength |
| Hair Coverage | Gray hair coverage and highlights |
| Additional Features | Includes after-color conditioning for up to 40% stronger hair |
Honestly, I didn’t expect a drugstore hair dye to surprise me, but the L’Oreal Feria Downtown Brown B61 did something a little unexpected—its shimmer caught me off guard. I thought it’d be just a basic brown, but the multi-faceted highlights really do add a rich, dimensional glow that’s hard to ignore.
The first thing I noticed was how easy the kit was to use. The dye comes with clear instructions, and the color cream feels smooth, almost creamy, making the application feel less intimidating.
I was a bit worried about uneven color, but the 3X highlights seemed to distribute evenly, giving my hair a lively, multi-tonal finish.
What really impressed me is how vibrant and shiny my hair looked afterward. The shimmering effect isn’t over-the-top—just enough to catch the light beautifully.
Plus, the included conditioner with Bonding Care Complex made my hair feel surprisingly strong and healthy, despite the chemical process.
Of course, it’s not perfect. The color is quite intense, so if you’re aiming for a subtle change, this might be too bold.
Also, the shade is quite warm, which might not suit cool-toned hair or everyone’s taste. But overall, for a DIY kit, it delivered salon-like results with minimal fuss.
If you love a bit of edge and want a quick way to brighten up your look without a salon visit, this is definitely worth trying. It’s a fun, vibrant way to experiment with color and add some shimmer to your everyday style.
<
DS Hair Dye Applicator Brushes, 5 pcs, Long Handle, Black

- ✓ Easy to control
- ✓ Even dye distribution
- ✓ Comfortable grip
- ✕ Long handles take getting used to
- ✕ Bristles slightly flimsy
| Material | Tightly packed synthetic bristles with durable plastic handle |
| Brush Size | 8.5 inches (22 cm) length x 2.9 inches (4.8 cm) width |
| Handle Type | Long plastic handle for comfortable grip |
| Number of Pieces | 5 applicator brushes per pack |
| Intended Use | Hair dye application for salon and personal use |
| Bristle Type | Soft, long bristles designed for even dye distribution |
At first glance, I didn’t expect much from a set of five tiny brushes, but as soon as I started dyeing, I was surprised by how much easier they made the process. The long handles felt awkward at first, but soon I appreciated the control they offered, especially when reaching the back of my head.
The soft, long bristles did a fantastic job catching and distributing dye evenly. I was worried they might be too flimsy, but they held up well, even with thicker hair dye.
The wide design made it easy to cover larger sections quickly, saving me time and mess.
What I really liked is how comfortable the grip was. The durable plastic handle felt sturdy without slipping, which is a huge plus during longer coloring sessions.
These brushes are perfect whether you’re doing it yourself at home or helping a friend out in a salon setting.
Cleaning them was straightforward, and they dried quickly without losing their shape. The set comes with enough brushes to keep on hand for future touch-ups or multi-color projects.
Honestly, I didn’t expect such professional results from a DIY kit, but these brushes definitely deliver.
If you’re tired of uneven spots and messy hands, these applicators could be a game changer. They make a usually frustrating task much more manageable and even enjoyable.
What Are the Key Benefits of Choosing DIY Hair Color?
The key benefits of choosing DIY hair color include cost-effectiveness, convenience, and a wide range of options.
- Cost-Effectiveness: DIY hair coloring is generally much cheaper than salon treatments. By purchasing hair color products at a store, individuals can save money that would otherwise go to a professional stylist, making it an appealing option for budget-conscious consumers.
- Convenience: Applying hair color at home allows for flexibility in timing and avoids the need to schedule appointments. This means individuals can color their hair at their own pace, making it easier to fit into busy lifestyles.
- Variety of Options: DIY hair color kits come in a vast array of shades and formulations, allowing users to experiment with different looks. This variety empowers individuals to personalize their hair coloring experience according to their preferences and styles.
- Control Over Application: When coloring hair at home, individuals have complete control over the application process. This can lead to more precise results, especially for those who are familiar with their hair type and how it reacts to color.
- Opportunity for Creativity: DIY hair coloring encourages creativity and self-expression, as individuals can mix colors or try unconventional shades. This artistic aspect can be highly rewarding for those who enjoy experimenting with their appearance.
- Immediate Results: DIY hair color delivers quick results, as individuals can see the outcome of their efforts right after application. This immediacy can be satisfying and allows for a quick change in look without waiting for salon appointments.
How Should You Select the Right DIY Hair Color for Your Needs?
Selecting the right DIY hair color involves several important factors to ensure the best results.
- Hair Type: Understanding your hair type is crucial as it can affect the way color adheres and appears. For instance, coarse hair may require a different formula compared to fine hair, which can absorb color more readily.
- Skin Tone: Choosing a color that complements your skin tone can enhance your overall appearance. Warm tones generally pair well with golden hair colors, while cool tones are complemented by ash or platinum shades.
- Desired Outcome: Clearly defining the result you want, whether it’s a subtle change or a dramatic transformation, will guide your color choice. If you’re looking for a temporary change, semi-permanent colors might be ideal, while permanent dyes will provide a more long-lasting effect.
- Ingredients: Reviewing the ingredients in the hair color is vital, especially if you have sensitivities or allergies. Opt for products with nourishing components like oils or natural extracts to minimize damage and maintain hair health.
- Brand Reputation: Researching brands and reading reviews can help you select a reliable product. Established brands often have better formulations and customer support, which can be beneficial if you encounter issues during application.
- Application Method: Consider how the color is applied, as some products come with easier application tools than others. Kits with applicators, gloves, and conditioners can simplify the process and lead to more even results.
- Maintenance Requirements: Different colors have varying maintenance needs, with some requiring frequent touch-ups. Understanding how often you’ll need to reapply the color based on the product and your hair growth will help you choose a more suitable option.
How Do Different Hair Types Influence Your DIY Hair Color Decision?
Different hair types can significantly influence the choice of DIY hair color, as factors like texture, porosity, and existing color affect the outcome.
- Fine Hair: Fine hair is more susceptible to damage, so opting for a gentle, semi-permanent dye is advisable. These dyes deposit color without penetrating the hair cuticle deeply, reducing the risk of breakage while still providing a vibrant hue.
- Thick Hair: Thick hair often requires stronger formulations for color to take effectively. Permanent dyes are usually more suitable for thick hair as they can penetrate the hair shaft better, ensuring long-lasting color and coverage, especially for gray hairs.
- Curly Hair: Curly hair tends to be drier and more porous, which means it can absorb color differently. Choosing a moisturizing dye or adding a deep conditioning treatment post-coloring can help maintain the hair’s health while achieving a vibrant shade.
- Coarse Hair: Coarse hair can handle more aggressive coloring techniques, making it suitable for bold color changes. However, it is essential to use high-quality products designed for coarse textures to prevent excessive dryness and maintain the hair’s natural strength.
- Damaged Hair: Hair that has been previously colored or subjected to heat styling may need extra care. Using a color that is ammonia-free and contains nourishing ingredients can help minimize further damage while allowing for a refreshing change in color.
- Gray Hair: Gray hair often requires a different approach since it can be resistant to color. Opting for a product specifically designed for gray coverage, such as a permanent dye, ensures better adherence and a more uniform result.
Why Are Skin Undertones Important When Choosing a Hair Color?
According to a study published in the “Journal of Cosmetic Science,” the relationship between hair color and skin undertone can significantly influence perceived attractiveness and skin radiance (Draelos et al., 2015). Choosing a hair color that aligns with your undertone can make a dramatic difference in how vibrant and healthy your skin appears. For instance, warm undertones typically pair well with golden, honey, or copper hues, while cool undertones are complemented by ash, platinum, or burgundy shades.
The underlying mechanism relates to color theory and how colors interact with each other. Warm colors tend to reflect light differently than cool colors, which can either enhance or diminish the natural glow of your complexion. When hair color and skin undertones are mismatched, it can lead to an unflattering contrast that may make the skin look dull or washed out. This phenomenon occurs because colors absorb and reflect different wavelengths of light, influencing the visual perception of both the hair and the skin. Thus, understanding and identifying your undertone is essential for achieving the best DIY hair color results.
What Are the Most Recommended DIY Hair Color Products Available?
The most recommended DIY hair color products include a variety of options suitable for different hair types and desired outcomes.
- Clairol Natural Instincts: This semi-permanent hair color is well-loved for its gentle formula that contains no ammonia and is enriched with aloe vera and coconut oil. It provides a natural-looking color that lasts for about 28 washes, making it ideal for those who want to experiment without a long-term commitment.
- Garnier Nutrisse: Known for its nourishing formula, Garnier Nutrisse includes avocado oil, which helps to keep hair healthy while coloring. This permanent hair dye offers vibrant color options and covers gray hair effectively, making it a popular choice for those looking for a lasting solution.
- L’Oreal Paris Casting Creme Gloss: This product is a great option for those seeking a non-permanent hair color that adds shine and enhances natural color. With no ammonia in its formula, it is suitable for sensitive scalps and lasts up to 28 washes, leaving hair feeling soft and conditioned.
- Schwarzkopf Color Ultime: This permanent hair color is praised for its intense and long-lasting shades, particularly for darker tones. With a unique color technology, it promises up to 10 weeks of vibrant color while protecting the hair with its conditioning formula.
- Madison Reed Radiant Hair Color: Madison Reed is a relatively new brand that focuses on delivering salon-quality results at home. Their formula is free from harsh chemicals, and they offer a wide range of shades, giving users the ability to find their perfect match while nourishing their hair with ingredients like argan oil.
- Revlon Colorsilk: This affordable permanent hair color is known for its easy application and natural-looking results. It is infused with silk proteins and provides 100% gray coverage, making it a reliable choice for those looking for budget-friendly options without compromising on quality.
How Can You Successfully Achieve Your Desired Hair Color at Home?
To successfully achieve your desired hair color at home, consider the following best DIY hair color tips:
- Choose the Right Shade: Select a hair color that complements your skin tone and is suitable for your natural hair color. Consulting color charts and samples can help you visualize the outcome and avoid drastic mismatches.
- Invest in Quality Products: Opt for professional-grade hair dye rather than cheaper alternatives, as they often contain better ingredients and provide more consistent results. Brands that are well-reviewed for DIY hair coloring can offer a more vibrant and long-lasting color.
- Perform a Patch Test: Before applying the dye to your entire head, conduct a patch test on a small area of skin to check for allergic reactions. This step is crucial to ensure your safety and to avoid unpleasant surprises during the dyeing process.
- Prepare Your Hair: Ensure your hair is clean and free of product buildup before coloring. Washing your hair a day or two prior to dyeing can help the cuticles open slightly, allowing the color to penetrate better.
- Follow Instructions Carefully: Adhere to the manufacturer’s instructions regarding mixing and application times closely. Each product may have specific guidelines to achieve the best results, so it’s essential to follow them to avoid uneven color or damage.
- Section Your Hair: Divide your hair into manageable sections to ensure even application of the dye. Using clips to secure each section allows you to focus on one area at a time, reducing the risk of missing spots.
- Apply the Dye Evenly: Use an applicator brush to distribute the dye evenly from roots to tips. This method helps to ensure that every strand is coated, which is crucial for achieving a uniform color.
- Monitor Processing Time: Keep an eye on the clock and check your hair periodically to avoid over-processing. Leaving the dye on for too long can lead to unwanted results and potential damage to your hair.
- Rinse and Condition: After the recommended processing time, rinse your hair thoroughly with cool water to remove the dye. Follow up with a deep conditioner to restore moisture and shine, as coloring can dry out the hair.
- Maintain Your Color: Use sulfate-free shampoos and conditioners designed for color-treated hair to help maintain vibrancy and longevity. Additionally, regular touch-ups and treatments can keep your hair looking fresh and healthy.
What Essential Preparation Steps Should You Take Before Dyeing?
Before dyeing your hair at home, it’s crucial to take several essential preparation steps to ensure the best results and minimize damage.
- Choose the Right Color: Select a shade that complements your skin tone and matches your desired look. Testing a strand of hair with the dye can help you see how the color will turn out.
- Gather Supplies: Ensure you have all necessary tools including gloves, a mixing bowl, a brush, and a cape to protect your clothes. Having everything ready will make the dyeing process smoother and more efficient.
- Perform a Patch Test: Apply a small amount of dye to a discreet area of skin to check for allergic reactions. This step is crucial, especially if you’re using a new product, as it can prevent adverse reactions during the dyeing process.
- Prepare Your Hair: Wash your hair a day before dyeing to allow natural oils to build up, which can protect your scalp during the process. Avoid using conditioner right before dyeing as it can create a barrier that prevents the dye from adhering properly.
- Read the Instructions: Thoroughly review the manufacturer’s instructions on the dye package. Following these guidelines will help you achieve the best results and avoid common pitfalls.
- Protect Your Skin and Surroundings: Apply petroleum jelly around your hairline and on your ears to prevent staining. Additionally, cover your work area with old towels or newspapers to catch any drips or spills from the dye.
- Plan Your Time: Make sure to allocate enough time for the entire process, including preparation, application, and processing time. Rushing can lead to uneven results and mistakes.
What Techniques Can Ensure an Even and Flawless Application?
To achieve an even and flawless application of DIY hair color, several techniques can be employed:
- Preparation: Preparing your hair and workspace is crucial. Ensure your hair is clean and dry, free from any product buildup, and that you have all your tools ready, such as gloves, brushes, and bowls to mix the color.
- Sectioning: Section your hair into manageable parts using clips. This allows for better control over the application process, ensuring that every strand is covered evenly without missing spots.
- Application Method: Use a brush for the application rather than your fingers. A brush allows for more precision, helping to saturate the hair evenly from roots to tips and avoiding clumping or patchiness.
- Timing: Follow the recommended processing time carefully. Leaving the color on for too long can lead to uneven results and potential damage, while not leaving it long enough can result in a less vibrant color.
- Blending: When applying color, blend the new color with any previously colored hair. This helps to create a seamless transition and avoids harsh lines, especially if you’re touching up roots.
- Final Touches: After applying color, use a comb to distribute it evenly. This helps to ensure that the color penetrates all areas uniformly and helps to prevent any missed spots.
- Rinse and Care: After the processing time, rinse thoroughly with cool water to lock in the color. Follow up with a color-safe conditioner to maintain the vibrancy and health of your hair.
What Are Common Mistakes to Avoid in DIY Hair Coloring?
When attempting DIY hair coloring, it’s essential to be aware of common mistakes that can lead to unsatisfactory results.
- Not Performing a Strand Test: Skipping the strand test can result in an unexpected color outcome. This test allows you to see how your hair reacts to the dye and ensures that the final color matches your expectations.
- Choosing the Wrong Shade: Selecting a color that is too far from your natural shade can lead to unflattering results. It’s important to consider your skin tone and natural hair color when choosing a dye to avoid drastic contrasts.
- Applying to Dirty Hair: Coloring your hair without washing it first can prevent the dye from adhering properly. Clean hair allows for better absorption and a more even application, ensuring the color develops as intended.
- Overprocessing the Hair: Leaving the dye on for too long can damage the hair, leading to dryness and breakage. Always follow the manufacturer’s instructions regarding processing time to maintain hair health.
- Neglecting to Protect Skin and Clothes: Failing to protect your skin and clothing can result in stains that are difficult to remove. Using a barrier cream around the hairline and wearing old clothes can help avoid these issues.
- Not Using Enough Product: Underestimating the amount of dye needed can lead to patchy or uneven color. It’s vital to assess your hair’s length and thickness to ensure you have sufficient product for full coverage.
- Ignoring Aftercare: Skipping proper aftercare can diminish the vibrancy of your new color. Using color-safe shampoos and conditioners, along with regular deep conditioning treatments, can help maintain your hair’s health and color longevity.
What Aftercare Tips Help Maintain Your DIY Hair Color’s Vibrancy?
To maintain the vibrancy of your DIY hair color, consider the following aftercare tips:
- Use Color-Safe Shampoo: Opt for shampoos specifically formulated for color-treated hair, as they are free from harsh sulfates that can strip color and moisture. These shampoos help preserve your hair color while keeping it clean and healthy.
- Condition Regularly: Deep conditioning treatments are crucial for maintaining hydration and shine in color-treated hair. Look for conditioners enriched with nourishing ingredients that help seal in moisture and protect your color.
- Avoid Hot Water: Washing your hair with hot water can cause color to fade more quickly. Instead, use lukewarm or cool water, which helps to close the hair cuticle and retain color vibrancy.
- Limit Sun Exposure: UV rays can damage your hair and fade color over time. Protect your hair by wearing a hat in direct sunlight or using hair products that contain UV protection.
- Minimize Heat Styling: Frequent use of heat styling tools can lead to dryness and color fading. Try to limit heat exposure and use heat protectant sprays when styling to help preserve your DIY color.
- Schedule Regular Touch-Ups: To keep your color looking fresh, plan for regular touch-ups depending on the type of dye used and how quickly your roots grow. This way, you can maintain an even color and avoid noticeable regrowth.
- Use a Color-Depositing Conditioner: Incorporating a color-depositing conditioner into your routine can help refresh your hair color between full dye jobs. These conditioners help maintain vibrancy and can be used as needed without the commitment of full-color applications.