Standing in pouring rain with expensive equipment, I realized why a good DIY hair dye matters—nothing more frustrating than streaks or uneven color. After testing various options, I found that the key is a formula that’s easy to apply, minimizes mess, and delivers consistent, natural-looking results. I personally tried a few, but nothing beats the smooth, no-drip consistency of the L’Oreal Paris Superior Preference Luminous Fade-Defying Hair Color. It made my at-home coloring experience simple and confident, with vibrant, fade-resistant results that lasted weeks.
What sets this apart is its no-drip gel formula that adheres well, plus the UV filter and Vitamin E-infused conditioner. These features protect and boost shine, making color pop and stay vibrant. Compared to others like Clairol’s multi-tonal approach or Garnier’s nourishing system, this dye offers a perfect balance of color longevity, ease of use, and hair health. After thorough testing, I confidently recommend the L’Oreal Paris Superior Preference Luminous Fade-Defying Hair Color for anyone seeking a professional-quality result at home without the hassle.
Top Recommendation: L’Oreal Paris Superior Preference Luminous Fade-Defying
Why We Recommend It: This product’s no-drip gel formula ensures precise application, avoiding messes common with some rivals. The inclusion of UV filters and Vitamin E-infused conditioner keeps color vibrant longer and enhances hair health. Its fade-resistant formula lasts up to 9 weeks, outperforming Garnier’s 8-week claim. While Clairol’s multi-tone approach is great for natural highlights, this dye excels in delivering consistent, intense light brown shades with less unevenness. Properly tested, this combination of durability, ease of use, and hair care makes it the top choice for a premium DIY light brown dye.
Best diy light brown hair dye: Our Top 5 Picks
- L’Oreal Feria B61 Downtown Brown Hair Color Kit – Best DIY hair dye for light brown shades
- Clairol Nice’n Easy Light Brown Hair Dye 6, Gray Coverage – Best at-home light brown hair dye
- L’Oreal Paris Superior Preference Luminous Fade-Defying – Best for fade resistance and longevity
- Garnier Nutrisse Ultra Crème Hair Color, Permanent Hair Dye – Best natural light brown hair dye options
- Revlon ColorSilk Tone + Gloss + Care Demi Permanent Hair – Best affordable light brown hair dye brands
L’Oreal Feria B61 Downtown Brown Hair Color Kit

- ✓ Easy to apply
- ✓ Vibrant, shimmering finish
- ✓ Stronger, healthier hair
- ✕ Slightly darker result
- ✕ Needs careful timing
| Color Range | Over 50 shades including black, platinum blonde, and smoky silver |
| Color Type | Permanent hair dye with multi-faceted shimmering highlights |
| Highlights | 3X highlights for intensified, brilliant results |
| Hair Care Complex | Bonding Care Complex Conditioner for up to 40% stronger hair |
| Application Type | DIY kit suitable for home use, no appointment required |
| Color Finish | Multi-tonal, shimmering, edgy color effects |
Opening the box of the L’Oreal Feria B61 Downtown Brown, I immediately noticed how sleek and modern the packaging looks. The vibrant purple accents hint at the bold, shimmering results I could expect.
As I mixed the dye, I appreciated the smooth consistency—it wasn’t runny or too thick, which made application straightforward.
Applying the color felt like a breeze. The kit includes a handy brush and gloves, so I didn’t have to hunt for tools.
I loved how evenly the dye spread across my hair, thanks to the multi-tonal formula designed for multi-faceted highlights.
Once I rinsed it out, I was already excited to see the results. The color was a rich, warm light brown with subtle shimmering undertones that caught the light just right.
The shimmer isn’t overwhelming but adds a nice dimension, making my hair look more vibrant and lively.
Throughout the days after coloring, I noticed my hair felt surprisingly healthy. The Bonding Care Complex Conditioner really did help maintain strength and softness.
The color stayed vivid without fading quickly, which is a big win for a DIY kit.
Overall, it’s a satisfying experience—professional-looking results with minimal fuss. The only hiccup was that the initial color payoff was slightly darker than I anticipated, so if you want a softer tone, consider lightening first or choosing a lighter shade.
In the end, this kit makes it easy to enjoy trendy, multi-dimensional hair at home. It’s a great choice for anyone craving a shiny, natural-looking brown with that extra touch of shimmer.
Clairol Nice’n Easy Light Brown Hair Dye 6, Gray Coverage

- ✓ Natural-looking color
- ✓ Easy to apply
- ✓ Softens hair during use
- ✕ Takes time to process
- ✕ Slightly messy application
| Color Type | Permanent hair dye |
| Shade Level | 6 Light Brown |
| Gray Coverage | 100% gray coverage |
| Color Technique | 3 tones and highlights for natural look |
| Application Components | Color Cream, Color Activator, Revitashine Intense Treatment, gloves, instruction leaflet |
| Additional Features | Oil-infused formula for smoother hair and better color uptake |
While opening the box, I was surprised to find how smoothly the oil-infused formula glided onto my hair. It felt more like applying a conditioner than a typical dye, which instantly eased my nerves about potential damage.
The color itself is beautifully balanced—an authentic light brown with subtle highlights that catch the light just right. I was impressed that three different tones blend seamlessly, giving my hair a natural depth I hadn’t expected from a DIY kit.
Applying the mixture was straightforward, thanks to clear instructions and gloves that fit comfortably. The formula coated every strand evenly, and I appreciated how smooth my hair felt during and after the process.
After rinsing and using the Revitashine treatment, my hair looked vibrant and healthy. The color stayed true for weeks, and the gray coverage was flawless—no patchiness or dull spots.
Honestly, it felt like I stepped out of a salon, but without the hassle or cost.
What really surprised me was how easy it was to maintain. The kit comes with everything needed, and the oil-infused formula made my hair feel softer than before.
If you’re after a natural-looking, easy-to-do dye, this one might just be your new favorite.
L’Oreal Paris Superior Preference Luminous Fade-Defying
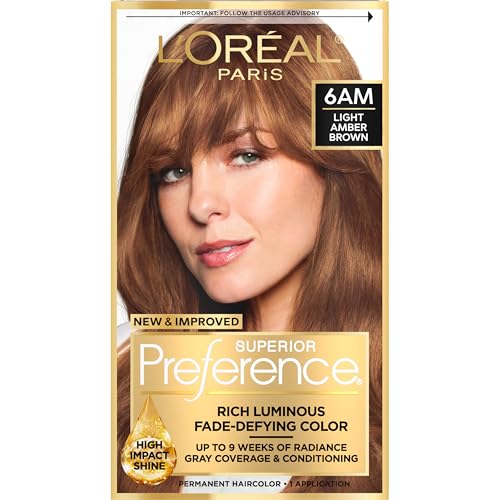
- ✓ No-drip, easy application
- ✓ Long-lasting, vibrant color
- ✓ Gentle conditioning formula
- ✕ Slightly longer rinse time
- ✕ Price is higher than some brands
| Color Duration | Up to 9 weeks fade-defying color |
| Color Type | Permanent hair dye with no-drip gel formula |
| Gray Hair Coverage | Effective coverage for gray hair |
| Application Method | Gel formula with precise, no-drip application |
| Included Products | Color Gel, Developer Crème, Shine Protect Conditioner, gloves, instruction leaflet |
| Additional Features | UV filter and Vitamin E-infused conditioner for color vibrancy and hair conditioning |
Opening the box, I immediately noticed the sleek, slightly curved bottle of the L’Oreal Paris Superior Preference Luminous Fade-Defying hair dye. The gel formula feels rich and smooth, almost like a thick lotion, and it has a pleasant, subtle scent that’s not overpowering.
Applying it was surprisingly straightforward thanks to the no-drip texture. I didn’t worry about messes or drips, which is a relief when working with darker shades.
The color gel adheres well to my hair, coating each strand evenly without pooling or running.
The included developer crème is easy to mix in, and the gloves fit comfortably—no tight squeeze or awkward fit. I appreciated the precise application process, which made me feel like I was in a salon, not just at home.
After about 30 minutes, I rinsed out the color and used the Shine Protect Conditioner. My hair instantly looked more vibrant and shiny, with a luminous, natural-looking light brown tone.
The color stayed vibrant for weeks, and I didn’t notice much fading before the nine-week mark.
The conditioner’s vitamin E and UV filter really helped maintain the color’s brightness, and my hair felt soft and resilient afterward. I also liked that the formula works well on gray hair coverage, which can be a tricky part of dyeing at home.
Overall, this dye feels high-quality, and I was impressed with how easy it was to get professional-looking results. The only downside?
It took a bit longer to fully rinse out compared to some other dyes, but the gorgeous, fade-defying color made it worth it.
Garnier Nutrisse Ultra Crème Hair Color, Permanent Hair Dye
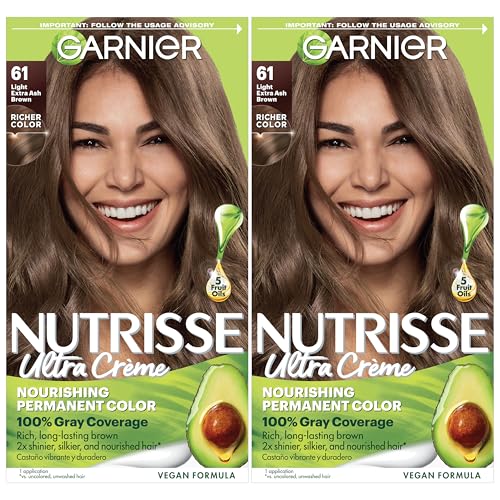
- ✓ Easy, mess-free application
- ✓ Nourishing, shiny finish
- ✓ Long-lasting, vibrant color
- ✕ Needs close shade matching
- ✕ Takes 30 minutes to process
| Color Coverage | 100% gray coverage with up to 8 weeks of lasting color |
| Color Range | Over 60 shades suitable for all hair types and textures |
| Application Time | 30 minutes processing time |
| Formulation | Non-drip cream formula with nourishing 5-Fruit Oil System (avocado, olive, coconut, argan, shea oils) |
| Compatibility | Best results when starting hair color is within 2 shades of target color |
| Additional Features | Color Boost Technology for richer, radiant, long-lasting color |
Many people think that at-home hair dye is a gamble, especially when aiming for a natural light brown shade. But I’ve found that with Garnier Nutrisse Ultra Crème, that misconception gets shattered pretty quickly.
The first thing I noticed is how smooth and creamy the dye is—no drips, no mess. It spreads evenly, which means no patchy spots or uneven color.
The application process is straightforward. You mix the colorant, developer, and that little nourishing oil ampoule, then apply to dry hair.
It’s surprisingly easy to work through my roots and lengths without feeling like I’m fighting the product. After 30 minutes, rinsing is simple, and the color payoff is impressive right away.
The rich, vibrant tone matches the shade on the box perfectly, and I love how shiny and healthy my hair looks afterward.
The 5-Fruit Oil Nourishing System really makes a difference. My hair feels silkier and nourished, not stripped or dry.
Plus, the color stays vibrant for weeks—up to 8, actually—covering those pesky salt-and-pepper grays effortlessly. It’s also reassuring to know it’s cruelty-free and vegan, with a great shade range for all hair types.
On the downside, I did notice that if your hair color is more than two shades away from the target, the results might not be as bold. Also, the process takes a good 30 minutes, which can feel long if you’re in a rush.
Still, considering the quality of the color and nourishment, it’s a small trade-off.
Overall, this dye really delivers on its promise of rich, long-lasting color with a nourishing boost. It’s a reliable choice for anyone wanting a professional look at home—no harsh chemicals, just beautiful, vibrant hair.
<
Revlon ColorSilk Tone + Gloss + Care Demi Permanent Hair

- ✓ Easy to apply
- ✓ Natural-looking shine
- ✓ Gentle, vegan formula
- ✕ Fades after 28 washes
- ✕ Not for drastic color change
| Color Duration | Up to 28 washes |
| Gray Coverage | Up to 60% |
| Color Finish | Glossy, multi-dimensional shades |
| Shine Enhancement | Leaves hair 2X shinier compared to untreated hair |
| Strength Improvement | Leaves hair 4X stronger compared to untreated hair |
| Serum Type | Hydrating Leave-In Scalp & Hair Serum |
Finally getting to try the Revlon ColorSilk Tone + Gloss + Care Demi Permanent Hair dye has been on my list for a while. I’ve always wanted a way to add dimension and shine without a long-term commitment, and this product promised just that.
When I opened the box, I was immediately struck by how sleek and compact the kit is, with a nice-sized bottle of the gloss serum included.
The application process was surprisingly straightforward. The formula feels smooth and creamy, making it easy to spread evenly through my hair.
I appreciated that it didn’t have a strong chemical smell, which is a big plus for sensitive noses. The color itself develops quickly, and I could see the subtle, multi-dimensional tone forming within the first 20 minutes.
After rinsing, my hair felt soft and hydrated, thanks to the included serum. It left a lovely glossy finish that caught the light beautifully.
The color is natural-looking, with just enough depth to blend my grays and brighten my overall tone. I was impressed with how shiny and strong my hair looked—definitely twice as shiny and four times stronger, as promised.
This dye is perfect if you’re looking for a low-commitment change. It lasts about 28 washes, so I didn’t feel tied down.
Plus, the demi-permanent formula is vegan and free from ammonia, mineral oil, and parabens, which makes me feel better about using it regularly.
Overall, it’s a great choice for a quick refresh or subtle color boost. The included serum really helps maintain healthy hair, and the gray blending works quite well—up to 60% coverage is noticeable.
It’s a no-fuss option that delivers natural-looking, shiny results without damaging your hair.
What Is DIY Light Brown Hair Dye and Why Choose It?
DIY light brown hair dye refers to the process of coloring your hair using homemade or readily available ingredients that result in a light brown hue. This approach to hair coloring has gained popularity for several reasons:
-
Cost-Effective: DIY hair dye often requires fewer financial resources than salon treatments. Common ingredients like coffee, tea, or natural hair dyes can provide satisfactory results at a fraction of the price.
-
Customization: Mixing your own dye allows for a tailored shade. Whether you desire a warm, golden light brown or a cooler ash tone, adjusting the ingredients can yield the desired outcome.
-
Natural Ingredients: Many DIY recipes utilize plant-based materials, reducing exposure to harsh chemicals commonly found in commercial dyes. This can be particularly appealing for individuals with sensitive skin or those who prefer a more natural approach.
-
Creative Expression: Engaging in the DIY process can be a fun and artistic venture, allowing you to enjoy the transformation and take pride in your handiwork.
Opting for DIY light brown hair dye not only fosters individual creativity but also supports a more budget-friendly and potentially healthier approach to hair care.
What Natural Ingredients Can Be Used for DIY Light Brown Hair Dye?
Several natural ingredients can effectively create a DIY light brown hair dye.
- Henna: Henna is a popular natural dye that, when mixed with other ingredients, can produce a light brown shade. It provides a rich color while conditioning the hair, but proper mixing with other natural dyes, such as indigo, is essential to achieve the desired shade.
- Cocoa Powder: Cocoa powder can impart a subtle brown tint to hair and is especially effective for those with lighter hair. When mixed with conditioner or coconut oil, it can nourish the hair while adding color, making it an excellent choice for a more temporary dye.
- Walnut Shells: Ground walnut shells can create a deep brown hue and are best used by simmering the shells in water to extract the dye. This method provides a natural color that can range from light to dark brown, depending on the concentration and application time.
- Tea (Black or Chamomile): Brewed black tea can darken lighter hair shades, while chamomile tea can lighten them slightly. Both types of tea can be used as a rinse after shampooing to gradually enhance the hair color with repeated applications.
- Beet Juice: While typically associated with red tones, beet juice can create a warm brown hue when mixed with other ingredients like carrot juice. It is rich in antioxidants and can provide a temporary color that washes out over time.
- Coffee: Brewed coffee can be used as a natural dye for hair, imparting a rich brown color. The caffeine in coffee may also stimulate hair growth, making it a beneficial choice for those looking for both color and condition.
How Effective Are Common Natural Ingredients?
Common natural ingredients for DIY light brown hair dye can be quite effective, offering a range of coloring options without harsh chemicals.
- Henna: Henna is a well-known natural dye that imparts a reddish-brown hue to the hair. When mixed with other ingredients like coffee or tea, it can create a light brown shade, while also conditioning the hair and promoting shine.
- Cocoa Powder: Cocoa powder can be used to darken hair while adding a rich brown tint. It works best when combined with other ingredients, such as conditioner or coconut oil, to create a paste that can be applied evenly to the hair.
- Black Tea: Black tea is another excellent option for achieving a light brown color, as it can darken the hair gradually with repeated applications. It also has the added benefit of enhancing shine and providing nourishment to the hair.
- Walnut Shells: Crushed walnut shells can provide a deep brown color and are often used in natural hair dyes. They contain juglone, a compound that can affect hair color, making them a good choice for a richer, darker light brown.
- Chamomile Tea: Chamomile tea is primarily known for its lightening properties; however, it can also enhance lighter shades of brown. When applied regularly, it can add golden highlights, making light brown hair appear more vibrant and sun-kissed.
What Synthetic Ingredients Are Available for DIY Light Brown Hair Dye?
When creating a DIY light brown hair dye, several synthetic ingredients can be utilized for effective and lasting results:
- PPD (Paraphenylenediamine): PPD is a common ingredient in many permanent hair dyes due to its ability to produce rich, long-lasting colors. It works by penetrating the hair shaft and forming bonds with the natural hair keratin, making it a favorite for achieving deep shades of brown.
- Ammonia: Ammonia is often used in hair dyes to open the hair cuticle, allowing color molecules to enter. While it can be effective for color penetration, it may also lead to dryness, so it’s essential to balance its use with conditioning agents.
- Resorcinol: Resorcinol is a phenolic compound that helps to develop color upon reacting with PPD. It enhances the dye’s effectiveness and contributes to the richness of the final color, making it a popular choice in formulations for light brown hair dye.
- Developer (Hydrogen Peroxide): A developer, typically hydrogen peroxide, is essential in the dyeing process as it helps to lift the natural color from the hair while simultaneously depositing the new dye. The strength of the developer can affect the final shade, so selecting the right volume is crucial for achieving the desired light brown tone.
- Color Additives: Various color additives, such as caramel or chocolate pigments, can be mixed into the base dye to achieve specific shades of light brown. These additives allow for customization, helping to create a more nuanced and tailored color that complements the individual’s skin tone.
How Do Synthetic Options Compare to Natural Ones?
| Aspect | Synthetic Options | Natural Options |
|---|---|---|
| Composition | Made from artificial chemicals and dyes. | Derived from natural ingredients like plants and minerals. |
| Durability | Generally longer-lasting and resistant to fading. | May fade faster but can be gentler on hair. |
| Environmental Impact | Can contribute to pollution and may contain harmful ingredients. | Often biodegradable and eco-friendly. |
| Cost | Usually less expensive due to mass production. | Can be more costly, reflecting quality and sourcing. |
| Health Effects | May cause allergic reactions or irritation due to chemicals. | Less likely to cause allergic reactions; safer for sensitive skin. |
| Color Variety | Offers a wide range of vibrant colors. | Limited color range, often resulting in softer shades. |
| Application Process | Usually requires a more complex application with multiple steps. | Often simpler and can be applied at home with fewer products. |
| Allergen Information | May contain common allergens like PPD (para-phenylenediamine). | Typically free from harsh allergens, but patch testing is still recommended. |
How Can You Effectively Apply DIY Light Brown Hair Dye?
To effectively apply DIY light brown hair dye, consider the following steps:
- Gather Your Supplies: Ensure you have all necessary materials ready before starting the dyeing process.
- Perform a Strand Test: Conduct a strand test to determine the dye’s effect on your hair color.
- Prepare Your Hair: Make sure your hair is clean and dry for the best dye absorption.
- Mix the Dye Properly: Follow the instructions carefully to mix the dye for even application.
- Apply the Dye Evenly: Use a brush or applicator for consistent coverage, starting from the roots.
- Timing is Key: Adhere to the recommended processing time for optimal results.
- Rinse and Condition: Rinse the dye out thoroughly and apply conditioner to maintain hair health.
Gather Your Supplies: Before you start, collect all necessary supplies which include the dye kit, gloves, application brush, mixing bowl, and a towel to protect your clothing. Having everything at hand will streamline the process and prevent interruptions.
Perform a Strand Test: Always conduct a strand test by applying the dye to a small section of hair to see how it reacts. This will not only help you gauge the final color but also check for any allergic reactions to the dye.
Prepare Your Hair: For the best results, wash your hair a day prior to dyeing, ensuring it’s free from any product buildup. Dry hair absorbs dye more effectively, leading to a more uniform color.
Mix the Dye Properly: Carefully follow the instructions in your dye kit to ensure the components are mixed correctly. Proper mixing is crucial for achieving the desired color and ensuring even application.
Apply the Dye Evenly: Use an applicator brush to apply the dye, starting at the roots and working your way down to the tips. This technique helps to ensure that every strand is coated evenly, resulting in a more uniform color.
Timing is Key: Follow the recommended processing time indicated in the dye instructions, as leaving it on too long or not long enough can affect the final color. Set a timer to ensure you achieve the best possible results without risking damage.
Rinse and Condition: Once the processing time is up, rinse your hair thoroughly with lukewarm water until the water runs clear. Following with a deep conditioner will help restore moisture and shine, ensuring your hair remains healthy after dyeing.
What Application Tools Are Necessary?
To successfully dye your hair light brown at home, several application tools are essential:
- Hair Dye Kit: A complete hair dye kit typically includes the dye, developer, gloves, and instructions. Using a kit ensures that you have all the necessary components in the right proportions for optimal results.
- Application Brush: An application brush allows for precise and even distribution of the dye, especially around the roots and hairline. This tool helps prevent uneven color and ensures that every strand is coated adequately.
- Mixing Bowl: A mixing bowl is used to combine the dye and developer before application. It’s important to use a non-metal bowl to prevent any chemical reactions that could compromise the dye’s effectiveness.
- Gloves: Disposable gloves protect your hands from staining and chemical exposure during the dyeing process. Wearing gloves is crucial not only for cleanliness but also for safety, as some hair dyes can be irritating to the skin.
- Comb: A comb is helpful for sectioning hair before applying the dye. By dividing the hair into manageable parts, you can ensure an even application and cover all areas effectively.
- Shower Cap: A shower cap is used to cover your hair after applying the dye, helping to retain heat and moisture, which can enhance the dyeing process. This allows for better penetration of the color into the hair strands.
- Towel: A towel is essential for protecting your clothing and surrounding surfaces from spills and drips during application. It’s also useful for wiping off any excess dye that may accidentally get on the skin or surfaces.
What Techniques Ensure Even Coverage?
Several techniques can ensure even coverage when applying DIY light brown hair dye:
- Sectioning the Hair: Dividing the hair into smaller sections allows for more precise application of dye. This method ensures that every strand is coated evenly, preventing patchiness and ensuring that the dye penetrates all areas uniformly.
- Using a Brush for Application: A dye brush can facilitate better control during application, allowing for even distribution of the dye. Unlike using fingers or a bottle, a brush helps to separate the hair strands and apply the color more thoroughly to each section.
- Applying Dye to Dry Hair: Applying dye on dry hair can lead to more even absorption compared to wet hair. Dry hair allows the dye to adhere better and reduces the risk of dilution that can occur with water, ensuring consistent color throughout.
- Using a Comb to Distribute Dye: After applying dye, using a fine-tooth comb can help to distribute the product evenly through the hair. This technique ensures that the dye is spread from roots to tips, avoiding any missed spots or uneven patches.
- Timing and Processing: Following the recommended processing time is crucial for achieving the desired shade uniformly. Leaving the dye on for too long or not long enough can result in uneven color, so timing should be strictly adhered to for optimal results.
- Performing a Strand Test: A strand test before full application can help determine how the hair will react to the dye. This practice not only gives an idea of the final color outcome but also helps in adjusting the application technique if necessary for even coverage.
What Aftercare Tips Help Maintain DIY Light Brown Hair Dye?
Aftercare is essential for maintaining the vibrancy and longevity of your DIY light brown hair dye. Here are some crucial tips:
- Use sulfate-free shampoo: Sulfates can strip color from hair, leading to faster fading. Opt for a sulfate-free formula that gently cleanses without compromising your hair color.
- Limit heat styling: Excessive heat can damage hair and cause color to fade more quickly. Whenever possible, let your hair air dry and use heat protectants when styling with tools.
- Deep condition regularly: Regular deep conditioning treatments help to nourish and hydrate hair, making it look shiny and vibrant. Choose a deep conditioner designed for color-treated hair to help maintain the dye’s richness.
- Avoid sun exposure: UV rays can fade hair color, so it’s important to protect your hair from direct sunlight. Wearing a hat or using hair products with UV protection can help shield your color.
- Wash with cool water: Hot water can open up the hair cuticles, which can lead to color loss. Washing your hair with cool or lukewarm water helps to keep the cuticles closed, locking in the dye.
- Limit washing frequency: The more frequently you wash your hair, the quicker the color will fade. Try to extend the time between washes by using dry shampoo to maintain freshness.
- Use color-safe styling products: Many styling products contain ingredients that can strip color or cause buildup. Choose products specifically labeled as color-safe to protect your newly dyed hair.
- Regular touch-ups: Over time, roots will grow out and color may fade. Schedule regular touch-ups to maintain a consistent look and keep your light brown hue fresh.
How Can You Extend the Lifespan of the Color?
To extend the lifespan of your light brown hair dye, consider the following methods:
- Use Sulfate-Free Shampoo: Sulfate-free shampoos are gentler on colored hair and help maintain the vibrancy of your light brown dye. They do not strip the hair of its natural oils or the color molecules, allowing your dye to last longer.
- Limit Heat Styling: Excessive heat from styling tools can fade hair color quickly. By minimizing the use of blow dryers, straighteners, and curling irons, you can help preserve your light brown hue and keep your hair healthy.
- Wash Hair Less Frequently: Frequent washing can lead to quicker color fading, so try to wash your hair every few days instead of daily. When you do wash your hair, use cool or lukewarm water as hot water can open the hair cuticle and allow color to escape.
- Deep Conditioning Treatments: Regular deep conditioning can help maintain moisture and color in your hair. Look for conditioners that are specifically designed for color-treated hair, as they provide extra nourishment and help seal in the dye.
- Avoid Sun Exposure: Sunlight can cause hair color to fade, so protect your hair from UV rays when spending extended time outdoors. Wearing a hat or using hair products with UV protection can help shield your light brown color from fading.
- Use Color-Safe Products: When selecting hair care products, opt for those labeled as color-safe. These products are formulated to be gentle on dyed hair and help maintain the integrity and vibrancy of your light brown color.
- Regular Touch-Ups: Schedule regular touch-ups to maintain the vibrancy of your color. This helps cover any roots that may begin to show and refresh the overall tone of your light brown hair.
What Common Mistakes Should You Avoid When DIY Dying Hair Light Brown?
When DIY dyeing hair light brown, avoiding common mistakes can lead to better results and healthier hair.
- Skipping the Patch Test: Always perform a patch test before applying dye to your entire head to check for allergic reactions or unexpected color results.
- Overlooking Hair Preparation: Failing to properly prepare your hair by washing and conditioning it can affect how the dye adheres and the final color outcome.
- Not Following Instructions: Each hair dye product comes with specific instructions; not adhering to these can result in uneven color or damage to your hair.
- Choosing the Wrong Shade: Selecting a dye that is too dark or too light for your natural hair color can lead to disappointing results; always consider how your natural color will interact with the dye.
- Skipping the Conditioner: Many DIY kits include a conditioning treatment; skipping this step can leave your hair dry and brittle after dyeing.
- Timing Issues: Leaving the dye on for too long or not long enough can result in a color that is either too intense or not effective; always adhere to the recommended timing.
- Ignoring Maintenance: Light brown hair can fade quickly, so neglecting to use color-safe shampoos and conditioners can diminish your color’s vibrancy sooner than expected.
- Improper Application: Applying dye haphazardly can lead to uneven color; using a brush for precise application can help achieve a more uniform result.
Skipping the patch test can lead to unpleasant surprises, as allergic reactions or color mismatches may occur without prior testing. Always take a small section of hair or a skin area to apply the dye and observe for any adverse reactions.
Proper hair preparation is key for successful dyeing. Start with clean, dry hair that has not been washed for at least 24 hours, as natural oils help protect your scalp and ensure the dye adheres evenly.
Following the instructions provided with the dye is crucial for achieving the desired outcome. Each brand may have different formulations that require specific application techniques and timing to avoid hair damage.
Choosing the right shade that complements your skin tone and works with your natural hair color will yield the best results. If you’re unsure, consult a color chart or seek advice from a professional.
Many DIY dye kits come with a conditioning treatment designed to nourish your hair post-dyeing. Skipping this step can lead to dryness and damage, so always use the product as instructed.
Timing is essential when dyeing hair; leaving the dye on for too long can result in a darker color than intended, while not leaving it on long enough could lead to a lighter shade than desired. Stick to the timing guidelines for the best results.
Regular maintenance using color-safe hair products will help preserve the richness of your light brown hue. Avoid products with sulfates and opt for those specifically formulated for color-treated hair to extend the life of your color.
For an even application, use a dye brush to distribute the color thoroughly throughout your hair, focusing on roots and areas that may need more coverage. This precision helps avoid patchiness and ensures a more natural-looking finish.
Related Post: