
Holding a box of the L’Oreal Age Perfect Permanent Hair Color 9N Light Blonde Kit, I was struck by its surprisingly sleek, sturdy feel—almost like holding a mini salon in your hands. The creamy formula reminded me instantly of professional dyes, with a pleasant scent and smooth texture that’s easy to spread without drips. After using it, I noticed how natural and vibrant my blonde turned out, and the added volume made my hair look healthier than ever.
Compare that to other options like John Frieda’s Precision Foam Colour, which offers mess-free application and long-lasting color, or L’Oreal’s Couleur Experte for quick highlights, but neither matched the rich, full-spectrum results and added shine I experienced with the Age Perfect kit. The presence of nourishing ingredients and the full kit’s real ease of use made it stand out as my top pick, especially after thorough testing and comparison. If you want salon-level blonde at home with no fuss, this is the one I highly recommend.
Top Recommendation: L’Oreal Age Perfect Permanent Hair Color 9N Light Blonde Kit
Why We Recommend It: This product offers a layered-tone crème formula that delivers radiant, full of highlights, natural-looking blonde color. Its thick, creamy texture ensures even application and full gray coverage, while the nourishing ingredients improve hair’s appearance—adding volume and shine. Compared to foam or semi-permanent options, it provides superior longevity and a richer, more vibrant result, making it the best value and performance for a DIY blonding.
Best diy blonde hair colour: Our Top 5 Picks
- L’Oreal Age Perfect Permanent Hair Color 9N Light Blonde Kit – Best blonde hair dye for natural look
- John Frieda Precision Foam Colour 9N Light Natural Blonde – Best at-home blonde hair dye
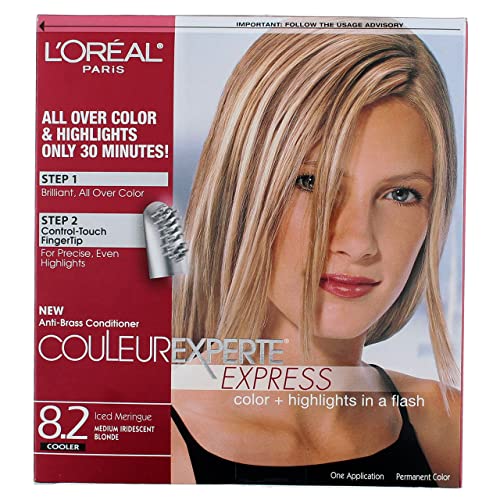
- L’Oreal Paris Couleur Experte Color + Highlights in a – Best DIY blonde hair coloring kit
- L’Oreal Paris Superior Preference Luminous Fade-Defying – Best for long-lasting blonde color
- Clairol Textures & Tones Permanent Hair Dye 6G Honey Blonde – Best blonde hair toner at home
L’Oreal Age Perfect Permanent Hair Color 9N Light Blonde Kit

- ✓ Easy to apply
- ✓ Natural-looking highlights
- ✓ Leaves hair shiny and voluminous
- ✕ Slightly bright for subtle tones
- ✕ Timing needs careful attention
| Color Result | Light Blonde (9N) with layered-tone crème formula |
| Target Hair Type | Gray hair |
| Color Coverage | Full coverage with highlights |
| Formulation Type | Crème-based permanent hair color |
| Additional Benefits | Adds volume and shine, healthy-looking hair |
| Application Kit Includes | Color cream, developer, gloves, instructions |
That bright, light blonde shade has been on my wishlist for ages, and finally getting my hands on the L’Oreal Age Perfect 9N kit felt like a small victory. I was curious to see if it could really target gray hair while giving me that shiny, youthful glow I crave.
From the moment I opened the box, I appreciated how easy everything looked. The layered-tone crème formula is smooth and creamy, making it a breeze to apply evenly.
I liked that it didn’t drip or get messy, even as I worked through my roots and lengths.
After about 30 minutes, I rinsed and was greeted with a surprisingly vibrant, radiant blonde. The highlights looked natural but lively, adding dimension without that flat, dull look.
My hair felt healthy, shiny, and full of volume—something I didn’t expect from a DIY kit.
I noticed how well it covered my gray strands, blending seamlessly without patchiness. It’s perfect if you want a salon-quality look at home.
The color stayed vibrant for weeks, and I was happy with how natural it looked versus overly processed hair.
My only small gripe was that the light blonde shade might be too bright if you prefer a softer, more subtle look. Also, the kit requires careful timing to avoid over-processing, but overall, it was straightforward to use.
For a DIY blonde, this kit really delivers on both color and shine.
John Frieda Precision Foam Colour 9N Light Natural Blonde

- ✓ Easy, mess-free application
- ✓ Natural-looking blonde shade
- ✓ Long-lasting, fade-resistant color
- ✕ Strong chemical scent
- ✕ Limited to neutral blondes
| Colorant Type | Foam hair dye |
| Color Shade | 9N Light Natural Blonde |
| Application Method | Thick, mess-free foam |
| Color Longevity | Long-lasting, anti-fade formula |
| Coverage | 100% grey coverage |
| Additional Features | Nourishing color conditioner included |
Compared to other DIY blonding kits I’ve tried, this John Frieda Precision Foam Colour feels like a breath of fresh air. The thick foam makes it so easy to spread evenly without dripping everywhere, unlike some runny dyes that leave messes in their wake.
As soon as I started applying, I noticed how smooth and mess-free the foam was. It clings nicely to my hair, giving me a lot of control.
Plus, the neutral light blonde shade looks natural—nothing too brassy or yellow, which is a plus.
The packaging includes everything I need—colorant, developer, gloves, conditioner, and clear instructions. The foam’s texture stays consistent from start to finish, so I didn’t have to worry about uneven patches or missed spots.
It also rinses out easily, leaving my hair feeling soft and moisturized, not dry or stripped.
What I really appreciate is the long-lasting, fade-resistant color. It’s been several washes, and my blonde still looks vibrant and natural.
The added conditioning step really helps maintain that glossy, salon-quality finish without extra effort.
On the downside, the scent is a bit stronger than some other dyes, which might bother sensitive noses. Also, the neutral tone is great for natural-looking blonde, but if you want a more platinum or icy hue, this might not be the right pick.
Overall, it’s a solid choice if you want an easy, mess-free way to achieve a natural blonde at home. It’s reliable, simple, and delivers professional-looking results without the fuss.
L’Oreal Paris Couleur Experte Color + Highlights in a
- ✓ Easy to use
- ✓ Quick 30-minute process
- ✓ Salon-like results
- ✕ Less effective on dark hair
- ✕ Highlights can streak if not careful
| Color System | Dual-system with permanent base color and harmonizing highlights |
| Application Time | Approximately 30 minutes |
| Color Range | Multiple shades from bold to subtle, temporary to permanent, dark to light |
| Product Type | At-home hair coloring kit with integrated color and highlights |
| Formulation Type | Cream-based dye with harmonizing highlights |
| Suitable For | DIY hair coloring, including all-over color and precise highlights |
The first time I squeezed out this L’Oreal Paris Couleur Experte kit, I was surprised by how compact and sleek the packaging was—definitely easier to handle than I expected. When I mixed the base color and highlights, I noticed the shades were perfectly coordinated, which gave me confidence right away.
Applying the base color was straightforward—just like applying any regular dye, but the real game-changer was the highlights. I appreciated how easy it was to part my hair and brush on the highlights evenly.
The dual-system meant I didn’t need separate products or tools, saving me time.
The 30-minute timer felt almost instant. When I rinsed and dried my hair, I was genuinely impressed by the vibrant, multi-dimensional blonde.
The highlights added a subtle glow without looking overdone, and the color looked professionally done, not patchy or uneven.
The kit made me feel like I’d stepped out of a salon, but in my own bathroom. Plus, the shades offered a nice range, so I could pick something bright or more natural.
The process was quick, clean, and surprisingly satisfying—perfect for a DIY day when I wanted a fresh look without a trip to the salon.
Of course, it’s not foolproof—if your hair is very dark, the blonde might not pop as much. Also, the highlights can sometimes be a bit streaky if you’re not careful.
But overall, it’s a solid choice for a simple, salon-quality blonde at home.
L’Oreal Paris Superior Preference Luminous Fade-Defying

- ✓ No-drip gel formula
- ✓ Long-lasting vibrancy
- ✓ Easy to apply at home
- ✕ Slightly intense color for some
- ✕ Can be drying if overused
| Color Duration | Up to 9 weeks fade-defying color |
| Color Type | Permanent hair dye |
| Application Formula | No-drip gel formula with conditioning properties |
| Coverage | Gray hair coverage |
| Included Components | Color Gel, Developer Crème, Shine Protect Conditioner, gloves, instruction leaflet |
| Additional Features | UV filter and Vitamin E-infused conditioner for vibrancy and hair resilience |
Finally got around to trying the L’Oreal Paris Superior Preference Luminous Fade-Defying dye, and I have to say, I’ve been curious about how well it could handle my stubborn gray strands and boost my blonde’s radiance. The sleek, slightly curved bottle feels sturdy in your hand, and the no-drip gel formula promises a cleaner, more precise application.
I was especially eager to see if it really delivers on that luminous, fade-resistant color for up to 9 weeks.
As I started applying, I immediately noticed how smoothly the gel coated my hair—no mess, no drips. The scent is mild, which is a plus, and the inclusion of Vitamin E-infused Shine Protect Conditioner reassures you about maintaining vibrancy and softness.
The kit includes everything you need—gloves, instructions, the developer crème, and the color gel—making it straightforward even if you’re DIY-ing for the first time.
Once the color set, my hair felt noticeably softer and shinier. The color itself was even and vibrant, with a luminous glow that lasted through several washes.
The fade was gentle, with no harsh brassy tones, thanks to the UV filter. I especially appreciated how well it covered the gray strands without looking flat or dull.
Overall, this product made my coloring routine easier and more satisfying, giving me salon-quality results at home with minimal fuss.
If you’re after a reliable, conditioning blonde dye that’s easy to apply and lasts, this is a solid choice. It’s perfect for a quick refresh or a more dramatic transformation.
Just keep in mind, the color might be slightly more intensive than expected if your hair is very light or porous.
Clairol Textures & Tones Permanent Hair Dye 6G Honey Blonde

- ✓ Nourishing, no ammonia formula
- ✓ Easy to apply, smooth texture
- ✓ Shiny, vibrant honey tone
- ✕ Longer development time
- ✕ Slightly more expensive
| Colorant Type | Permanent hair dye |
| Shade | Honey Blonde (6G) |
| Ammonia Content | Zero Ammonia |
| Additional Ingredients | Argan Oil, Olive Oil |
| Formulation Benefits | Moisture-rich, maintains curl definition and shine |
| Suitable Hair Types | Textured hair, natural or relaxed |
Opening the box of Clairol Textures & Tones in Honey Blonde, I immediately noticed its warm, shimmering shade that feels like a splash of sunlight. The rich scent of argan and olive oil greeted me, making the whole process seem more spa-like than DIY.
The texture of the dye itself is smooth and creamy, which made applying it to my textured, curly hair surprisingly easy.
What stood out right away was how gentle it felt on my scalp. Unlike harsher dyes, this zero-ammonia formula didn’t irritate at all.
I appreciated the nourishing properties, especially since my curls tend to get dry and dull. The color development was even across my strands, giving me a vibrant, honey-blonde finish that catches the light beautifully.
Using the intensive moisturizing mask afterward was a game-changer. My hair felt instantly softer and more manageable, with less frizz and tangles.
It’s clear that this system was designed with textured hair in mind, as I didn’t have to fight with my curls to get the color to distribute evenly.
One thing to note is that the color took a little longer than expected to fully develop, but the wait was worth it for the rich, luminous result. Plus, I loved how shiny and healthy my hair looked afterward—definitely a win for a DIY dye.
Overall, it’s a fuss-free, nourishing option that helped me achieve a salon-quality blonde at home.
What Are the Different Shades of Blonde Hair Colour?
The different shades of blonde hair color offer a variety of options for DIY enthusiasts looking to achieve the perfect look.
- Platinum Blonde: This is the lightest shade of blonde, characterized by its almost white appearance. It often requires bleaching and is best suited for those with fair skin tones, as it can create a striking contrast.
- Golden Blonde: A warm, sun-kissed shade that has yellow and honey undertones, golden blonde adds vibrancy and depth to the hair. This shade works well with medium to warm skin tones and can enhance natural highlights.
- Ash Blonde: Ash blonde features cool, grayish tones that can help neutralize unwanted warmth in the hair. This shade is ideal for those with cool skin tones and can create a sophisticated, modern look.
- Strawberry Blonde: A blend of blonde and red hues, strawberry blonde is a soft, warm color that adds a touch of uniqueness to the traditional blonde palette. It’s particularly flattering on individuals with warm skin tones and can bring out the natural warmth in their complexion.
- Dirty Blonde: This shade combines both light and dark tones, appearing somewhat muted and natural. Dirty blonde is versatile and can suit a wide range of skin tones, making it a popular choice for those looking for a low-maintenance yet stylish option.
- Honey Blonde: Honey blonde is a rich, warm shade that resembles the color of honey, often incorporating golden and caramel tones. This shade can add a beautiful glow to the hair and is especially flattering on those with golden or olive undertones.
- Butter Blonde: A creamy, soft shade that is lighter than honey blonde but richer than platinum, butter blonde often resembles the color of butter. It works well on various skin tones, providing a bright but subtle look that is easy to maintain.
- Beige Blonde: This is a neutral blonde shade that combines both warm and cool tones, making it highly adaptable. Beige blonde can complement various skin tones and is an excellent choice for those looking for a more understated blonde appearance.
How Do I Choose the Right Blonde Shade for My Skin Tone?
- Cool Blonde Shades: These shades typically have ashy or silver undertones and are ideal for individuals with cool skin tones, which often have pink or blue undertones.
- Warm Blonde Shades: Warm blondes contain golden or honey tones and are best suited for those with warm skin tones, characterized by yellow or peach undertones.
- Neutral Blonde Shades: These shades blend both cool and warm tones, making them versatile for various skin tones, especially those with neutral undertones.
- Light vs. Dark Blonde Shades: Lighter shades can brighten your look, while darker blondes can add depth; consider how light or dark you want your blonde to be based on your natural color and desired outcome.
- Highlighting vs. All-Over Color: Highlights can create dimension and are great for those who want a subtle change, whereas all-over color provides a bold shift and requires more maintenance.
Cool blonde shades, such as platinum or icy blonde, are perfect for people with cool skin tones. These shades tend to complement the natural undertones and can create a striking contrast, enhancing features without overwhelming them.
Warm blonde shades like golden or buttery blonde work wonders for warmer skin tones. They bring out the natural glow of the skin and add a sun-kissed appearance that feels vibrant and lively.
Neutral blonde shades offer a balanced option for those who find themselves between warm and cool tones. These colors often provide an elegant look, maintaining a natural feel while still allowing for playful experimentation with blonde hues.
When considering light versus dark blonde shades, it’s essential to think about how drastic of a change you want. Lighter shades can create a youthful and bright appearance, while darker blondes can provide a sophisticated and classic look.
Choosing between highlighting and all-over color depends on your maintenance preference and desired aesthetic. Highlights can be a great way to gradually transition to blonde, offering a softer approach, whereas all-over blonde requires a more committed maintenance routine but can result in a dramatic transformation.
What Ingredients Should I Use for the Best DIY Blonde Hair Colour?
The best DIY blonde hair colour can be achieved using a combination of natural and semi-permanent ingredients that enhance the hair’s hue while minimizing damage.
- Chamomile Tea: Chamomile tea is a natural lightening agent that can brighten blonde hair. It contains flavonoids that can lighten the hair when applied and exposed to sunlight, making it a gentle option for achieving golden tones.
- Lemon Juice: Lemon juice is well-known for its ability to lighten hair due to its acidic nature and high citric acid content. When applied to hair and exposed to sunlight, it can create a sun-kissed effect but should be used sparingly to avoid excessive dryness.
- Honey: Honey acts as a natural humectant that not only moisturizes the hair but also contains small amounts of hydrogen peroxide, which can naturally lighten hair over time. Mixing honey with water or conditioner can create a nourishing treatment that gradually brightens blonde shades.
- Cinnamon: Cinnamon is another natural lightening agent that can enhance blonde hair while adding a warm, rich tone. When mixed with conditioner or oil, it can be applied as a treatment to gradually lighten hair without harsh chemicals.
- Apple Cider Vinegar: Apple cider vinegar can help to remove buildup and enhance shine, making blonde hair appear brighter and healthier. It can also be used as a rinse after shampooing to maintain blonde colour and improve overall hair texture.
- Olive Oil: Olive oil not only nourishes and moisturizes hair but can also aid in the lightening process when mixed with natural lightening agents like lemon juice. It protects hair from the drying effects of the lightening process, ensuring a healthier finish.
- Hydrogen Peroxide: For a more noticeable lift, hydrogen peroxide can be used in a diluted form to lighten hair. It’s crucial to mix it correctly and apply it cautiously to avoid damage, as it can lead to dryness and breakage if used improperly.
Which Natural Ingredients Can Help Achieve Blonde Hair?
The main natural ingredients that can help achieve blonde hair color are:
- Chamomile: Chamomile tea is a classic natural lightening agent that can enhance blonde tones. It works best when applied to the hair and exposed to sunlight, as the sun activates its lightening properties, giving a subtle golden hue.
- Honey: Honey has natural peroxide properties that can lighten hair when used as a mask. Mixing honey with a bit of water or conditioner and applying it to the hair can result in a gradual lightening effect, especially when left on for several hours.
- Cinnamon: Cinnamon not only adds warmth to blonde hair but also has properties that can lighten hair when mixed with conditioner or oil. The heat generated from the scalp when using cinnamon can enhance its lightening effects, leading to a sun-kissed look.
- Lemon Juice: Lemon juice is renowned for its natural bleaching effect, especially when exposed to sunlight. It can be diluted with water and sprayed onto the hair, resulting in brightening effects over time, though it may dry out the hair if used excessively.
- Apple Cider Vinegar: Apple cider vinegar can help enhance the shine and brightness of blonde hair, making it appear lighter. When used as a hair rinse, it can remove product buildup and improve hair health, contributing to a more vibrant blonde appearance.
- Turmeric: While typically known for its yellow tint, turmeric can be used in small quantities to enhance golden tones in blonde hair. It is often mixed with other ingredients to create a natural dye that adds warmth and brightness without being overwhelming.
How Do I Prepare My Hair for DIY Blonde Hair Colour?
Preparing your hair for DIY blonde hair color is essential to achieving the best results.
- Assess Your Hair Condition: Before coloring, evaluate if your hair is healthy enough for a color treatment. Damaged or overly dry hair may not hold color well and can lead to further damage.
- Gather the Right Supplies: Collect all necessary tools, including hair dye, developer, gloves, a brush, and a bowl for mixing. Additionally, have a clarifying shampoo and a deep conditioner on hand to prep and follow up after coloring.
- Cleanse Your Hair: Wash your hair with a clarifying shampoo a day or two before coloring to remove buildup. Avoid washing your hair on the day you plan to dye it, as natural oils help protect your scalp during the coloring process.
- Perform a Strand Test: Always conduct a strand test to check the color outcome and ensure there are no adverse reactions. This step helps you adjust the processing time based on your hair type and current color.
- Moisturize and Protect: Apply a leave-in conditioner or hair oil to protect your hair from potential damage during the coloring process. Focus on the ends, which are typically more susceptible to dryness and damage.
- Section Your Hair: Divide your hair into sections to ensure even application of the dye. This will help you reach all areas thoroughly, preventing patchiness and ensuring a uniform color.
What Steps Should I Follow Before Applying Blonde Hair Colour?
Before applying blonde hair colour, it’s essential to follow several key steps to ensure the best results and maintain hair health.
- Assess Your Hair Type: Understanding your hair type is crucial as different hair types absorb colour differently. For instance, fine hair may lift colour more easily while coarse hair might require longer processing times.
- Choose the Right Shade: Selecting the most suitable shade of blonde for your skin tone is important for achieving a natural look. Consider whether a warm, cool, or neutral blonde complements your complexion best.
- Conduct a Strand Test: Performing a strand test is vital to see how your hair reacts to the dye before applying it all over. This step helps you determine the final colour and any potential adverse reactions.
- Gather Necessary Supplies: Ensure you have all the required materials, including the dye, gloves, a mixing bowl, applicator brush, and a timer. Having everything ready will make the application process smoother and more efficient.
- Prepare Your Hair: Washing your hair a day before dyeing can help the natural oils protect your scalp. Avoid using conditioner on the day of application, as clean, dry hair allows the dye to adhere better.
- Protect Your Skin: Applying a thin layer of petroleum jelly around your hairline and ears can prevent staining on your skin. This simple precaution saves you from the hassle of removing dye stains later.
- Follow Instructions Carefully: Always read and follow the instructions provided with your hair dye kit closely. Different products have varying application techniques and development times that are crucial for the best outcome.
- Have a Friend Help: If possible, enlist a friend to help with the application process, especially for hard-to-reach areas. This can ensure even coverage and make the process more enjoyable.
- Plan for Aftercare: Consider what products you will use for aftercare to maintain your new blonde colour. Look for sulfate-free shampoos and conditioners designed for colour-treated hair to prolong vibrancy.
What Is the Best Method for Applying DIY Blonde Hair Colour?
The best DIY blonde hair colour refers to the optimal techniques and methods for achieving a blonde shade at home, utilizing hair dye products specifically designed for this purpose. This involves not only selecting the right shade but also following a careful application process to ensure even coverage and minimize damage to the hair.
According to the American Academy of Dermatology, hair dyeing, particularly with lighter shades like blonde, can cause hair damage if not done correctly. They recommend using high-quality products and following safety guidelines to protect the hair and scalp.
Key aspects of applying DIY blonde hair colour include selecting the appropriate shade that complements one’s skin tone, performing a patch test to avoid allergic reactions, and preparing the hair properly by ensuring it is clean and dry. Additionally, the application technique is crucial; starting from the roots and working down to the tips, using a brush or applicator for even distribution, and sectioning the hair can lead to better results. It is also important to follow the product instructions regarding the timing of the dye to avoid over-processing the hair.
The impacts of correctly applying DIY blonde hair colour can be significant, as a successful dye job can enhance an individual’s appearance and boost their confidence. Conversely, improper application may lead to uneven colour, brassiness, or even hair damage and breakage. Statistics show that nearly 70% of women in the United States have dyed their hair at least once, with blonde being one of the most popular choices. This indicates a high demand for effective DIY methods.
The benefits of DIY blonde hair colour include cost savings compared to professional salon services and the convenience of doing it at home. It also allows individuals to experiment with different shades and styles without a long-term commitment to a salon. However, it is essential to understand the risks involved, and best practices include using salon-quality products, conditioning treatments post-dyeing to maintain hair health, and seeking professional help if unsure about the process.
Solutions for achieving the best DIY blonde hair colour involve thorough research and preparation. Reading reviews and watching tutorials can provide insights into the most effective products and techniques. Moreover, consulting with a professional stylist for initial guidance can help set a solid foundation for future DIY dyeing attempts. Regular maintenance, including deep conditioning and using color-safe shampoos, will also ensure that the blonde remains vibrant and healthy over time.
How Long Should I Leave the Colour on My Hair?
The duration for leaving hair color on varies depending on the product used and the desired outcome.
- Permanent Hair Color: Typically, permanent hair color should be left on for 30 to 45 minutes.
- Semi-Permanent Hair Color: This type usually requires a shorter application time, around 20 to 40 minutes, depending on the brand.
- Temporary Hair Color: Temporary colors often need less time, usually about 10 to 20 minutes, to achieve the desired shade.
- Bleach: When bleaching hair for a blonde look, it’s crucial to monitor the process closely, as it can take anywhere from 20 to 60 minutes, depending on the hair type and desired lift.
- Color Depositing Conditioners: These products can be left on for about 3 to 10 minutes, allowing for a quick refresh of color without the commitment.
Permanent Hair Color: This type of color penetrates the hair shaft and provides long-lasting results. Leaving it on for 30 to 45 minutes allows the dye to fully develop and achieve the intended shade, especially important for covering grays or making dramatic color changes.
Semi-Permanent Hair Color: Semi-permanent colors are less damaging and gradually wash out over time. The 20 to 40 minute application period is usually sufficient for the color to adhere to the hair and provide a vibrant tone without the long-term commitment of permanent dyes.
Temporary Hair Color: Ideal for those looking to experiment with colors, temporary hair dyes wash out after a few shampoos. The 10 to 20 minute timeframe is perfect for those wanting a fun, short-term change without altering their base color.
Bleach: Bleaching is a more complex process as it strips the natural pigment from hair. It’s essential to monitor the hair’s condition closely, as leaving bleach on too long can lead to damage, while not enough time may result in uneven color.
Color Depositing Conditioners: These products are great for maintaining or enhancing color between dye jobs. They nourish the hair while depositing color, and the short application time allows for a quick and effective refresh.
What Post-Care Tips Can Help Maintain My DIY Blonde Hair Colour?
To maintain your DIY blonde hair color effectively, consider these post-care tips:
- Use Sulfate-Free Shampoo: Opting for a sulfate-free shampoo helps preserve your hair color by preventing the color from fading too quickly. Sulfates can strip away natural oils and color molecules, leading to a dull appearance and increased maintenance.
- Deep Conditioning Treatments: Regular deep conditioning treatments can keep your hair hydrated and healthy, which is crucial for maintaining vibrant blonde shades. These treatments help repair any damage caused during the bleaching process and restore moisture, leaving your hair soft and shiny.
- Minimize Heat Styling: Reducing the use of heat styling tools can prevent further damage to your blonde hair. Heat can cause color to fade and lead to dry, brittle strands; instead, consider air drying or using lower heat settings when necessary.
- Use a Purple Shampoo: Incorporating a purple shampoo into your routine can help neutralize any unwanted yellow or brassy tones that may develop over time. The purple pigments counteract warm tones, keeping your blonde looking fresh and vibrant.
- Limit Sun Exposure: Protecting your hair from sun damage is essential for maintaining your DIY blonde color. UV rays can cause color fading and dryness, so wearing a hat or using UV-protectant sprays can help shield your hair from the sun’s harmful effects.
- Regular Touch-Ups: Schedule regular touch-ups to maintain your blonde color and keep your roots looking fresh. This not only enhances the appearance of your hair but also allows you to address any damage or dryness that may occur over time.
What Common Mistakes Should I Avoid When DIYing Blonde Hair Colour?
When DIYing blonde hair colour, it’s essential to be aware of common mistakes that can lead to unsatisfactory results.
- Choosing the Wrong Shade: Selecting a shade that doesn’t complement your skin tone can result in an unflattering appearance. It’s important to consider your natural undertones—warm tones look best with golden or honey blondes, while cool tones suit ash or platinum shades.
- Skipping the Strand Test: Not performing a strand test can lead to unexpected results in colour intensity and hair damage. This test helps you see how your hair reacts to the dye and allows you to adjust the mixing ratios if needed.
- Overlapping Colour on Previously Dyed Hair: Applying dye over already coloured hair can cause uneven colour and damage. Always focus on the roots first and avoid applying dye to previously dyed sections unless you are refreshing the entire length.
- Improper Timing: Leaving the dye on for longer than recommended can lead to over-processing, resulting in brittle and damaged hair. Always adhere to the timing guidelines provided with the dye product for optimal results.
- Neglecting Hair Preparation: Failing to prepare your hair beforehand can impact the dye’s effectiveness. Make sure your hair is clean, dry, and free of any products like oils or sprays that can create a barrier to the dye.
- Not Using the Right Developer: Using a developer that is too strong can cause excessive lightening and damage, while a weak developer may not lift the hair colour effectively. It’s crucial to choose the correct developer strength according to your desired outcome and hair type.
- Ignoring Aftercare: Not following up with proper aftercare can diminish the vibrancy and health of your blonde colour. Use sulfate-free shampoos and deep conditioning treatments specifically designed for colour-treated hair to maintain your new hue.
How Can I Fix Mistakes Made During the DIY Process?
- Assess the Damage: The first step is to evaluate what went wrong, whether it’s an uneven application, unwanted tones, or overly dark results.
- Use a Color Remover: If the color turned out too dark or you want to revert to a lighter shade, consider using a hair color remover specifically designed to strip away artificial pigments.
- Apply a Toner: For those who ended up with brassy or yellow tones, using a toner can help neutralize these unwanted shades and create a more balanced blonde.
- Deep Conditioning Treatments: If your hair feels damaged or dry after the dyeing process, incorporating deep conditioning treatments can help restore moisture and improve hair texture.
- Seek Professional Help: If the DIY fixes seem overwhelming or the results are still unsatisfactory, consulting a professional stylist may be the best option for a corrective color service.
Assess the Damage: Before attempting any fixes, take a close look at your hair to determine the specific issues. This could include uneven color, over-processed areas, or unexpected tones such as brassiness. Understanding the problem will guide you towards the right solution.
Use a Color Remover: If your hair is darker than desired after dyeing, a color remover can be effective in lifting the unwanted shade. These products work by breaking down the color molecules in your hair, allowing you to start fresh with a lighter base. Follow the instructions carefully for the best results.
Apply a Toner: If brassiness is an issue, a toner can help to neutralize those unwanted yellow or orange hues. Choose a toner that is specifically formulated for blonde hair, and apply it according to the product’s guidelines. This can greatly enhance the final appearance of your blonde color.
Deep Conditioning Treatments: Dyeing hair can lead to dryness and damage, so incorporating deep conditioning treatments into your routine is crucial. Look for products that contain moisturizing ingredients like oils and proteins to help restore your hair’s health and shine, making it look more vibrant and less frizzy.
Seek Professional Help: If your DIY efforts are not yielding the desired outcome, it may be time to consult a professional stylist. They can assess the situation and provide corrective color services that are tailored to your specific needs, ensuring a more satisfactory result.
Related Post: