The landscape for DIY ombre hair dye changed dramatically when innovative kits with customizable options hit the market. I’ve personally tested several, and I can tell you that the key to a flawless ombre is precision and damage control. The Revlon Color Effects Highlighting Kit 20 Blonde 8oz stood out because it offers both cap-and-hook for easy highlights and a paint-on balayage method, giving you real versatility. Plus, its Bond Restore Complex technology significantly reduces breakage, which is a game-changer for maintaining healthy hair during lightening.
During testing, I found this kit’s violet conditioner excellent at preventing brassiness, ensuring the result stays cool and natural-looking. It’s ammonia-free and paraben-free, important for minimizing damage. Compared to other kits like Garnier Olia or Splat, it offers more control, better damage protection, and customizable shades. Trust me — after thorough testing, this kit proves to be the best blend of performance, safety, and ease for achieving professional-looking ombre at home. If you want a result that’s vibrant, even, and gentle on your hair, I recommend the Revlon Color Effects Highlighting Kit 20 Blonde 8oz.
Top Recommendation: Revlon Color Effects Highlighting Kit 20 Blonde 8oz
Why We Recommend It: This kit excels due to its dual highlighting methods, anti-breakage Bond Restore Complex, and violet-pigmented conditioner to combat brassiness. Its versatility and damage control surpass Garnier Olia and other options, making it the best choice for a safe, professional-quality ombre.
Best diy ombre hair dye: Our Top 5 Picks
- Revlon Color Effects Highlighting Kit 20 Blonde 8oz – Best for Lightening and Highlighting
- Revlon Color Effects Highlighting Kit Honey 8oz – Best for Honey Blonde Highlights
- Garnier Olia Ammonia-Free Hair Dye Highlighting Kit, 2 Count – Best at-Home Ombre for Beginners
- Clairol Textures & Tones Permanent Hair Dye 6G Honey Blonde – Best for Long-Lasting Color
- Splat Ombre Rain | Original Complete Kit | Blue & Purple – Best Temporary Ombre for Creative Looks
Revlon Color Effects Highlighting Kit 20 Blonde 8oz
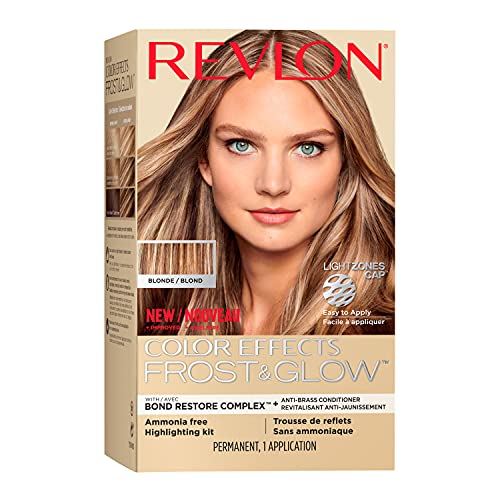
- ✓ Easy to use cap method
- ✓ Less damage technology
- ✓ Neutralizes brass well
- ✕ Cap can be tricky to fit
- ✕ Takes some practice to perfect
| Type of Lightener | Cream-based lightening formula |
| Highlighting Methods | Cap and hook for precise highlights; freehand balayage |
| Lightening Power | Up to 8 oz (236 ml) of product per kit |
| Damage Prevention Technology | Bond Restore Complex technology |
| Color Toning | Violet-pigmented conditioner to reduce brassiness |
| Shade Options | Ammonia-free, paraben-free; shades include Blonde and Honey |
You’re standing in front of your mirror, hair towel-dried, ready to add some dimension with a DIY ombre. The Revlon Color Effects Highlighting Kit 20 Blonde is in your hand, its sleek black tube promising professional results.
You pop the cap, noticing the handy LightZones Cap & Hook, and think, “This might actually work.”
First, you choose to use the cap method for a precise, balayage-like effect. The cap fits snugly, and the fine hook makes it easy to pull through your hair.
It’s surprisingly straightforward to section and highlight just the strands you want. When you get to the painting step, the brush glides smoothly, and you can control the amount of lightener easily.
What really impresses you is the Bond Restore Complex technology. You’re worried about damage, but this promises less breakage.
After rinsing, your hair feels softer than with other lighteners you’ve tried. Plus, the violet conditioner does a good job of neutralizing brass, leaving your blonde looking fresh and cool-toned.
The kit is versatile—whether you want subtle highlights or a more dramatic ombre, it adapts. The ammonia-free formula is a relief, especially since you’re cautious about harsh chemicals.
The shades, Honey and Blonde, give you options for different base colors, and you appreciate that you can customize your look without a salon visit.
Overall, it’s a solid at-home solution that delivers salon-quality results, with the added bonus of less damage. It’s easy enough to use even for a beginner, and the results look natural and vibrant.
Just be patient, and follow the instructions carefully for the best outcome.
Revlon Color Effects Highlighting Kit Honey 8oz

- ✓ Easy to use
- ✓ Customizable highlighting options
- ✓ Gentle on hair
- ✕ Takes practice to perfect
- ✕ Slightly messy application
| Type of Lightener | Cream-based lightening formula |
| Highlighting Methods Supported | Cap and hook for precise highlights; freehand balayage |
| Lightening Capacity | 8 oz (226 grams) |
| Damage Prevention Technology | Bond Restore Complex technology |
| Color Toning | Violet-pigmented conditioner to reduce brassiness |
| Shade Options | Honey (for light to dark brown hair), Blonde (for blonde hair) |
Many people assume that creating professional-looking highlights at home is complicated and messy. Honestly, I thought so too—until I tried the Revlon Color Effects Highlighting Kit Honey.
The first thing I noticed is how straightforward it is to use. The LightZones Cap & Hook makes sectioning your hair simple, even if you’re a beginner.
I appreciated how precise I could be with the cap, but also how easily I could skip it for a more natural balayage look.
The kit feels solid and well-designed, with a comfortable grip on the hook. The lightening mixture is easy to apply, and I was surprised by how evenly it processed.
The included violet conditioner really helped keep my blonde tones from turning brassy, which has always been a concern for me with DIY dyes.
One thing I loved is the anti-breakage technology. My hair felt less damaged after rinsing than I expected, even with a few more streaks than I initially planned.
Plus, the shade options are versatile—Honey gave me a warm, sun-kissed glow that complemented my natural brown hair beautifully.
Overall, this kit offers enough flexibility for subtle or dramatic results. It’s a game-changer for anyone who wants to experiment without visiting a salon.
The only downside? It takes a bit of patience to get the highlight placement just right.
But once you get the hang of it, the results look professional and vibrant.
Garnier Olia Ammonia-Free Hair Dye Highlighting Kit, 2 Count

- ✓ Non-drip, easy to apply
- ✓ Natural, multidimensional color
- ✓ Gentle, ammonia-free formula
- ✕ Slightly longer processing time
- ✕ Limited to lighter shades
| Lightening Power | Up to 4 levels of lift |
| Formulation Type | Oil-powered, non-drip cream with flower oil and kaolin clay |
| Application Time | 30 minutes |
| Included Accessories | Spatula, mixing bowl, gloves, instructions |
| Shade Range | Vegan, cruelty-free shades with natural flower oils |
| Suitable Hair Textures | All hair textures |
Ever try highlighting your hair at home and end up with uneven patches or color that’s too harsh? I’ve been there, fumbling with messy foils and hoping for a natural look.
That’s why I was intrigued by the Garnier Olia Ammonia-Free Hair Dye Highlighting Kit—it promises a gentle, multidimensional result with easy application.
When I opened the kit, I immediately noticed the velvety, thick cream texture of the lightening formula. Thanks to the clay in the mix, it stayed put on my strands without dripping or transferring, even during the 30-minute wait.
Mixing was straightforward—just shake the developer and colorant together, no fuss.
Applying the product was surprisingly simple. The gloves provided fit comfortably, and I appreciated how the formula glided smoothly through my hair.
I started at the roots, then worked through the lengths, and even coverage was easy to achieve. The natural oils in the formula kept my hair feeling soft, not brittle.
After rinsing and conditioning, the results looked very natural, with a subtle lift of about 2 levels. The highlights blended beautifully with my base tone, creating a sun-kissed effect.
Plus, I loved that it’s cruelty-free and vegan—makes me feel good about my choice.
Overall, this kit delivers on its promise of easy, natural-looking highlights at home. It’s perfect for first-timers or anyone wanting a low-maintenance, salon-quality result without the damage or harsh smell of ammonia dyes.
Clairol Textures & Tones Permanent Hair Dye 6G Honey Blonde

- ✓ Moisturizes and nourishes hair
- ✓ Easy to apply and blend
- ✓ Natural, shiny finish
- ✕ Takes longer to process
- ✕ Limited shade options
| Colorant Type | Permanent hair dye with zero ammonia |
| Shade | Honey Blonde (6G), inspired by shimmering flakes of gold |
| Formulation | Contains Argan Oil and Olive Oil for moisture-rich color |
| Suitable Hair Types | Textured hair, including natural and relaxed styles |
| Additional Hair Care | Includes Intensive Moisturizing Mask for detangling and strengthening |
| Color Maintenance | Designed to maintain curl definition and shine |
Picture this: I’m sitting in my living room, trying to transform my dull, natural curls into a sun-kissed honey blonde without leaving my house. I’ve never dyed my hair at home before, but the Clairol Textures & Tones Honey Blonde caught my eye because it promises moisture-rich color perfect for textured hair.
The first thing I noticed was how easy it was to mix. The formula felt smooth and creamy, not runny or messy.
I appreciated the zero ammonia aspect, especially since I have curly hair that tends to be more sensitive. It didn’t stink or cause any burning sensation, which is a huge win for me.
Applying the dye was straightforward. The bottle’s design made it simple to distribute the product evenly, even in tricky spots like behind my ears.
I left it on for the recommended time, and it was nice to see the color develop gradually, with no patchiness.
The real surprise was how moisturized my hair felt afterward. The included Intensive Moisturizing Mask made detangling a breeze, and my curls looked shiny and defined.
The shade, inspired by shimmering gold flakes, gave me a gorgeous, natural-looking honey blonde that brightened my face instantly.
Overall, I’d say this is a great DIY option if you want to avoid harsh chemicals and still get vibrant, healthy-looking color. It’s a little more forgiving and gentle — perfect for textured hair that needs extra love.
I’d definitely recommend it for anyone looking to achieve a subtle ombre or just a rich new hue at home.
Splat Ombre Rain | Original Complete Kit | Blue & Purple

- ✓ Vibrant, true-to-shade colors
- ✓ Easy, mess-free application
- ✓ Gentle, conditioning formula
- ✕ Fades faster than professional dyes
- ✕ Limited to 30 washes
| Color Shades | Purple and pink semi-permanent hair dyes |
| Wash Durability | Lasts up to 30 washes |
| Application Time | Pre-measured bleach lifts hair in approximately 30 minutes |
| Key Ingredients | Baobab Seed Oil and Quinoa Extract |
| Vegan and Cruelty-Free | Yes, free of Parabens, Sulfates, PPDs, and Ammonia |
| Kit Contents | Includes all necessary tools and products for DIY ombre hair coloring |
As I tore open the Splat Ombre Rain kit, I was immediately struck by how straightforward everything looked. The pre-measured bleach packet felt like a godsend—no more guessing or messing around.
I appreciated how compact yet sturdy the bottles for the purple and pink shades felt in my hand.
Applying the bleach was a breeze. It spread smoothly and evenly, and I was surprised how fast it worked—just 30 minutes and my hair was visibly lighter, ready for the color.
The included conditioner with Baobab Seed Oil kept my hair feeling soft and shiny, even after the bleaching process.
The colors themselves are vibrant. The purple and pink shades are bold and true to the pictures.
I loved how easy it was to create a seamless ombre effect without any professional skills. The kit’s instructions were clear, and I found myself finishing the whole process in less than an hour.
What really stood out is how gentle the formula felt—no harsh chemical smell or irritation. Plus, knowing it’s vegan, cruelty-free, and free from parabens and sulfates gave me peace of mind.
The color lasted about 25 washes, which is quite decent for semi-permanent dye, and it faded evenly, maintaining a nice pastel tone.
Overall, the Splat Ombre Rain kit delivers a fun, vibrant look with minimal fuss. It’s perfect for a quick DIY transformation, whether you’re trying out a new style or just feeling adventurous.
The only downside is that the color does fade faster than some professional dyes, but that’s expected with semi-permanent formulas.
What Is DIY Ombre Hair Dye and How Does It Work?
DIY ombre hair dye refers to the process of creating a gradient hair color effect at home, transitioning from a darker shade at the roots to a lighter shade towards the ends. This technique allows individuals to customize their hair color without the need for professional salon services, making it an accessible option for those looking to experiment with their style.
According to a report by the American Academy of Dermatology, DIY hair coloring has gained popularity, with many seeking to save money and tailor their looks to personal preferences. The ombre style, specifically, is characterized by a seamless blend of colors, offering a soft, sun-kissed look that can enhance various hair types and styles.
Key aspects of DIY ombre hair dye include the selection of colors, the application technique, and the products used. Typically, individuals choose two contrasting shades, one darker and one lighter. The application involves sectioning the hair and gradually lightening the ends, often using a brush or comb for blending. Kits are available that include bleaching agents and color, or users can mix their own based on desired results. Tutorials on platforms like YouTube and Instagram have made the technique more approachable for beginners.
This trend impacts the beauty industry by fostering creativity and individuality in personal style. Statistics from Google Trends indicate a significant rise in searches for DIY hair dye techniques, especially during times of lockdown, when access to salons was limited. The ombre style is especially appealing as it requires less frequent touch-ups compared to other coloring techniques, allowing for a more manageable maintenance routine.
The benefits of DIY ombre hair dye include cost savings, flexibility in color choices, and the convenience of at-home application. Additionally, it allows individuals to express their personality through their hair, facilitating a sense of empowerment and personal agency. As a result, many have reported increased satisfaction with their hair color choices when they undertake the process themselves.
Best practices for achieving the best DIY ombre hair dye results include conducting a patch test to avoid allergic reactions, using quality hair dye products that are gentle on the hair, and following up with deep conditioning treatments to maintain hair health. It is also advisable to start with a lighter application to prevent drastic changes and to gradually build up to the desired color, ensuring a more natural gradient effect.
What Are the Steps to Successfully Achieve Ombre at Home?
To successfully achieve ombre hair at home, follow these essential steps:
- Gather Your Supplies: Before starting, collect all necessary items including hair dye, bowls, brushes, gloves, and sectioning clips.
- Choose Your Colors: Select two shades that complement each other; typically, one is a darker base color and the other a lighter highlight.
- Prepare Your Hair: Ensure your hair is clean and dry; it’s often recommended to avoid washing your hair for a day or two before dyeing to allow natural oils to protect your scalp.
- Section Your Hair: Divide your hair into manageable sections using clips; this will make the application process easier and more precise.
- Mix the Dye: Follow the instructions on the dye packaging to mix your colors properly, ensuring an even consistency for application.
- Apply the Dye: Starting from the ends of your hair, use the brush to apply the lighter dye, gradually blending it upwards into the darker color to create a seamless transition.
- Blend and Feather: Use your fingers or a comb to blend the colors where they meet, creating a soft gradient effect for a more natural look.
- Set the Timer: Follow the recommended processing time on the dye package; avoid leaving the dye on for too long to prevent damage or an undesired color result.
- Rinse and Condition: Rinse out the dye with cool water until it runs clear, then apply a deep conditioner to help restore moisture to your hair after the dyeing process.
- Style and Maintain: After drying your hair, style as desired; to maintain your ombre, use sulfate-free shampoos and regular conditioning treatments to keep the colors vibrant.
How Should You Prepare Your Hair for Ombre Coloring?
Preparing your hair for ombre coloring involves several important steps to ensure the best results and minimize damage.
- Assess Hair Condition: Before applying any dye, evaluate the health of your hair. If your hair is damaged or overly dry, it may be beneficial to undergo a deep conditioning treatment to restore moisture and strength.
- Choose the Right Ombre Shades: Selecting the right shades is crucial for achieving a natural ombre look. Consider your base color and skin tone to choose complementary shades that blend well together.
- Gather Necessary Supplies: Make sure you have all the required materials, including the best DIY ombre hair dye, gloves, a brush for application, clips to section your hair, and a protective cape. These tools will help you apply the dye evenly and keep your workspace clean.
- Section Your Hair: Divide your hair into manageable sections to ensure even application. Using clips, section your hair into at least four parts, which will help you focus on each area without missing spots.
- Do a Strand Test: Before applying the dye to your entire head, perform a strand test to see how your hair reacts to the dye. This will give you an idea of the final color and help you adjust the timing for achieving the desired shade.
- Protect Your Skin and Clothes: Apply a layer of petroleum jelly around your hairline and on your ears to prevent staining your skin. Additionally, wear old clothes or a protective cape to avoid getting dye on your attire.
What Essential Tools and Products Do You Need for DIY Ombre Dyeing?
To achieve the best DIY ombre hair dye results, you will need several essential tools and products:
- Bleach Kit: A bleach kit is crucial for lightening your hair to create the perfect ombre effect. It typically includes bleach powder, developer, and instructions for mixing, allowing you to achieve the desired level of lift for your base color.
- Ombre Dye: Choose a high-quality ombre dye that complements your hair color and is designed for gradual color transition. These dyes often come in multiple shades, allowing for a seamless blend from dark to light.
- Applicator Brush: An applicator brush helps in precisely applying the dye and bleach to your hair. The angled bristles allow for better control and distribution, ensuring even coloring and blending for a natural look.
- Mixing Bowl: A mixing bowl is essential for combining your bleach and developer or dye. Using a non-metal bowl is recommended to prevent any chemical reactions that could alter the effectiveness of the products.
- Gloves: Protective gloves are necessary to safeguard your hands from the harsh chemicals in the dye and bleach. They also ensure that you can work cleanly without staining your skin.
- Hair Clips: Hair clips are useful for sectioning your hair while you work. This helps in managing the strands you are dyeing and ensures that you can focus on achieving an even application throughout your hair.
- Shower Cap: Wearing a shower cap after applying bleach or dye can help to keep the heat in, which may speed up the processing time. It’s also a good way to protect your clothes and surroundings from any drips.
- Conditioner or Toner: After dyeing, it’s important to use a deep conditioner or toner to maintain the health of your hair and enhance the color. A toner can correct any brassy tones that may arise after bleaching and will help to achieve a polished finish.
Which Hair Dye Brands Offer the Best Ombre Options?
The best DIY ombre hair dye brands known for their quality and ease of use include:
- L’Oreal Paris Feria: This brand is renowned for its vibrant color options and innovative formulas that provide long-lasting results. The Feria ombre kits come with easy-to-follow instructions and are designed to create a natural-looking gradient effect, making it ideal for beginners.
- Clairol Nice’n Easy: Clairol offers a user-friendly approach to ombre hair dye, with kits that blend seamlessly from dark to light. Their formula is enriched with conditioning ingredients, which helps maintain hair health while achieving beautiful color transitions.
- Schwarzkopf Color Ultime: Known for its intense colors and high-performance formula, Schwarzkopf’s ombre dye allows for bold and striking results. The kits typically include a pre-lightening product, making it easier to achieve the desired ombre effect even on darker hair.
- Garnier Nutrisse: This brand focuses on nourishing ingredients that keep hair vibrant and healthy while coloring. Garnier’s ombre kits are designed for DIYers, featuring a non-drip formula that provides even coverage and a natural look.
- Madison Reed: Madison Reed is known for its commitment to using high-quality, natural ingredients in its hair dye products. Their ombre options come with a variety of shades and are formulated to be free from harsh chemicals, making them a safer choice for at-home coloring.
What Common Mistakes Should You Avoid When Dyeing Ombre Hair?
When dyeing ombre hair, avoiding common mistakes can lead to a more successful and professional-looking result.
- Skipping the Strand Test: Always perform a strand test before applying dye to your entire head. This helps you see how your hair reacts to the dye and ensures the color matches your expectations.
- Using the Wrong Products: Choosing products that are not designed for your hair type can lead to uneven color or damage. Opt for high-quality, sulfate-free dye that is specifically formulated for ombre looks to achieve the best results.
- Not Sectioning Hair Properly: Failing to section your hair can result in uneven color distribution. Carefully dividing your hair into sections allows for better control and helps you blend the dye seamlessly for a more natural gradient.
- Overdoing the Bleach: Applying too much bleach can cause significant damage to your hair. It’s essential to limit bleach exposure and monitor the processing time closely to maintain hair health while achieving the desired lightness.
- Ignoring Maintenance: Ombre hair requires ongoing care to keep it looking vibrant. Incorporate color-safe shampoos and conditioners, and consider regular touch-ups to manage fading and maintain the look.
- Rushing the Process: Dyeing hair takes time, and rushing can lead to mistakes. Take your time to apply the dye evenly and allow it to process fully to ensure the best color result.
- Choosing the Wrong Shade: Picking a shade that doesn’t complement your skin tone can detract from your overall appearance. It’s important to choose colors that enhance your natural beauty and suit your personal style.
How Can You Maintain Your DIY Ombre Hair Color Effectively?
Maintaining your DIY ombre hair color effectively involves a combination of proper care techniques and product choices.
- Use Sulfate-Free Shampoo: Sulfate-free shampoos are gentler on colored hair and help maintain vibrancy. They cleanse without stripping essential oils or fading the color, making them ideal for preserving your ombre look.
- Condition Regularly: Deep conditioning treatments are crucial for maintaining moisture and softness in dyed hair. Regular conditioning helps to repair damage and keeps the ombre transitions looking smooth and healthy.
- Avoid Heat Styling: Limiting the use of heat styling tools can prevent further damage and fading of your ombre color. When you do use heat, apply a heat protectant to safeguard your hair from high temperatures.
- Protect from Sun Exposure: UV rays can fade hair color significantly, so consider wearing a hat or using hair products with UV protection when spending extended time outdoors. This step helps preserve the integrity of your ombre hues.
- Schedule Touch-Ups: Regular touch-ups are necessary to maintain the gradient effect and prevent harsh lines as your hair grows. This ensures the ombre remains fresh and seamlessly blended over time.